Houseplant · Bromeliaceae
Bromeliad
Bromeliaceae (family)
A topped-up cup plus bright but indirect light buys you months of color from a single rosette.
Bright indirect
Every 7–14 days
55–81°F · 13–27°C
USDA 10–11
Overview
Bromeliads are tropical plants prized for long-lasting color and a rosette of stiff leaves arranged to funnel rain into a central reservoir. Most sold as houseplants are epiphytes, anchoring on tree branches in the wild rather than rooting in soil. That growth habit governs their entire culture: the airy, fast-draining mix they sit in, and the way they take up most of their water through the center instead of the roots.
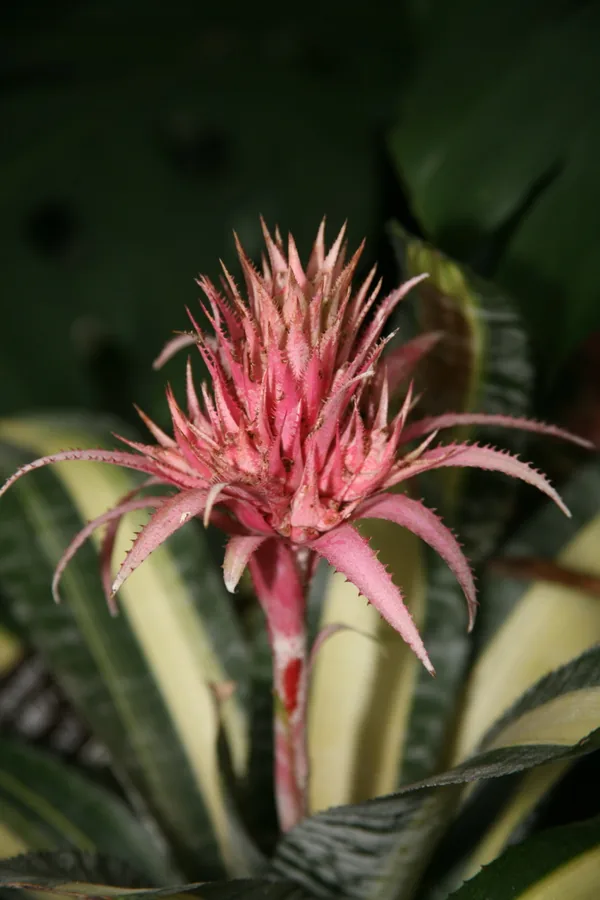
The showy part of the plant is rarely a true flower; it is a spike of vivid bracts that holds its color for months, far outlasting any real bloom. A rosette flowers exactly once. It then declines gradually, but only after raising a fresh crop of pups at its base, so what began as a single plant becomes many over the seasons.
As houseplants go, these are tolerant subjects and a sound choice for a first-time grower. Supply warmth, bright indirect light, and clean water in the cup, and their demands end about there. The most frequent way a bromeliad is lost is overwatering: moisture allowed to stand where roots and crown cannot tolerate it.
Care
The short version: bright indirect light, warm and humid air, an airy open mix that drains fast, and fresh low-mineral water held in the central cup with a weekly flush. The mix gets watered only after its surface has dried, because the roots exist mainly to anchor and rot when kept wet.
Light
These plants are built for bright but indirect light, the soft brightness found near a window without the direct beam. They will persist in medium light or light shade, though color dulls as light drops. Direct midday sun overloads and scorches the foliage, so keep the rosette clear of that hot beam.
Water
The central cup carries most of a bromeliad's water intake. Hold about 2 to 3 cm of fresh, low-mineral water in it, rainwater or distilled where possible, and flush it weekly so it never turns stale. Water the mix only once the top few cm have dried, because the anchoring roots rot quickly if left soggy.
Soil
Plant into a loose, fast-draining epiphytic mix of bark, perlite, and coarse peat, the kind packaged for orchids. A mildly acidic pH of 5.0 to 6.0 is what they prefer. Standard potting soil retains far too much water and will rot the root system.
Temperature
As tropicals, they perform best between 55°F and 81°F (13°C to 27°C), which falls within normal room conditions. Shield them from cold drafts and chilled winter windowsills, where low temperatures stress the plant.
Humidity
Bromeliads call for 50% to 70% humidity, above what most homes hold. Cluster plants, stand the pot on a pebble tray, or run a humidifier to raise it. When air runs too dry, the symptom is brown, crisp leaf tips.
Feeding
Feed monthly through spring and summer using a balanced water-soluble fertilizer cut to a quarter or half strength, applied to the mix or as a dilute foliar spray. Keep concentrated fertilizer out of the cup, where it can burn the crown.
Pruning
Cut away dead or browning outer leaves at the base and remove the spent flower spike once it has faded. The flowered mother rosette declines across many months, and it can be taken out completely once its pups have been removed.
Repotting
Repotting is seldom required, typically only every 2 to 3 years or when establishing a pup in its own pot. Move it on when the plant topples readily, when the mix has broken down and stays soggy, or when roots begin forcing their way out of the pot.
Size & spacing
Depending on the genus, most stand 12 to 35 inches (30 to 90 cm) tall with a spread of 12 to 24 inches (30 to 60 cm). Allow each plant enough clearance that air circulates freely around the rosette, which helps keep the cup and crown from staying damp.
Troubleshooting
Nearly every bromeliad problem comes back to water and light, and the first signals appear in the cup, the leaf tips, or the leaf color. Reading those early signs makes the remedy straightforward. Find the match below and act before rot or scorch has a chance to spread.
A center that has gone **soft and sour** while the rosette caves in
What you are seeing is crown or base rot, driven by anaerobic decay where water has sat undisturbed: either stale liquid lingering in the central cup or a mix that stays wet around roots built only for anchorage. Tip out and rinse the cup, let the mix dry, and shift the plant into a coarse, fast-draining medium if drainage is the weak link. Should the mother crown be past saving, lift any sound pups and grow on from those.
Fix:
- Empty and flush the central cup, then refill with fresh water
- Allow the potting mix to dry and improve drainage or repot into a coarse, fast-draining mix
- Salvage healthy pups if the mother crown is rotted beyond recovery
**Washed-out color** with bleached or scorched patches
Excess direct sun overloads the leaf surface, draining pigment and searing the most exposed faces, a reaction that hits hardest when a plant is moved abruptly into far stronger light. These genera are adapted to bright but indirect light. Pull the plant clear of harsh midday rays, then ramp it up to any brighter spot across a week or two so the foliage can adapt without scorching.
Fix:
- Move to bright but indirect light
- Acclimate gradually to brighter positions
Dry, **crisp tips** on leaves that are otherwise sound
Crisping at the tips points to two causes that often work together: air that is too dry, and the steady accumulation of minerals and salts carried in hard or fluoridated water. Lift ambient moisture into the 50% to 70% band with a pebble tray, a humidifier, or a cluster of plants, and supply the cup and mix with rainwater or distilled water instead. Damaged tissue cannot regreen, so trimming the brown ends is purely a cosmetic call.
Fix:
- Raise humidity (grouping, pebble tray, or room humidifier)
- Switch to rainwater or distilled water for the cup and mix
- Trim crispy tips for appearance only
A thriving rosette that **refuses to send up a spike**
Flowering is tied to maturity: the rosette has to reach full size first, and when a grown plant stalls and stays green, too little light is the typical limit. Set it in a bright, indirect position and allow it time. To prompt a mature plant, enclose it in a clear bag with a ripe apple for a few days; the apple releases ethylene, a gas that signals the plant to initiate the bract.
Fix:
- Increase light to bright indirect levels
- Be patient until the rosette reaches mature size
- Optionally encourage bloom by enclosing the plant with a ripe apple for a few days to expose it to ethylene
Toxicity
For a household with animals and children, the verdict is reassuring: common houseplant bromeliads are non-toxic to cats, dogs, and people, so you can site one purely by where the light suits it. The lone caveat is mechanical rather than chemical, since genera like Aechmea carry stiff, toothed leaf margins that can scratch skin or a curious paw.
Safe for
People · Cats · Dogs · Horses · Rabbits · Livestock · Birds
Cats None
Listed as non-toxic to cats, the common houseplant bromeliads pose no poisoning risk if one takes a curious bite. The single concern is mechanical: the toothed leaf margin on types such as Aechmea can scratch a paw or a nose.
Dogs None
Dogs share these bromeliads with no poisoning risk whatsoever. A persistent chewer may pick up a scrape from the stiffer, spiny-edged kinds, but the tissue itself carries nothing harmful.
Horses Safe
Nothing in these plants holds a toxin that would affect a horse. They are grown indoors and seldom come within reach of one in any case.
Rabbits Safe
Should a rabbit nibble a leaf, the common bromeliads carry no poison to worry about. Their tough, fibrous foliage reads more as a chew toy than as forage.
Livestock Safe
No toxin in the widely grown bromeliads acts on cattle, goats, or sheep.
Birds Safe
Pet birds sit safely beside these plants, with nothing toxic in either leaf or bract.
People Safe
Safe to display anywhere indoors. The only thing to mind is the sharp, toothed leaf edge some genera carry, which warrants care during handling.
Some bromeliads have stiff or finely toothed leaf edges; handle with care to avoid skin scratches.
Varieties
Bromeliaceae is an enormous family, yet a small set of genera accounts for most of what reaches homes and garden centers. These are the ones worth recognizing by name.
Guzmania
Smooth, strap-shaped green leaves frame an erect, long-lasting spike of bracts in clear red, orange, or yellow.
Aechmea (urn plant)
Broad, rigid leaves, frequently silver-banded and toothed along the edge, carry a pink flower head that holds for months.
Neoregelia (blushing bromeliad)
It skips the tall spike: as bloom nears, the flat, open rosette flushes vivid red or pink at its center.
Vriesea (flaming sword)
Banded or mottled foliage sits beneath a flattened, sword-shaped bract that earned the plant its common name.
Billbergia (queen's tears)
A tall, tubular rosette throws out arching, pendulous spikes in a striking but short-lived display.
How to propagate
There is seldom any reason to buy a second bromeliad, since each plant supplies its own replacements as it finishes flowering.
Offsets & pupsEasy
After flowering, once pups reach about one-third to one-half the size of the mother plant · Several weeks to a few months to root and establish
Propagation runs through pups, the offsets that emerge at the base once the mother has flowered. Hold off until a pup has reached roughly one-third to one-half the size of its parent and has put out a few roots of its own, then sever or gently snap it away. Set it into a loose, fast-draining bromeliad or orchid mix, keep it lightly moist with the cup filled, and it will root and settle over several weeks to a few months.
Myths
A bromeliad is dead and worthless once it flowers.
Each mother rosette flowers a single time and then declines slowly, yet that decline is far from a dead end. As it winds down it produces offsets, known as pups, around its base, and every pup matures into its own plant that flowers in its turn. One bloom is not an ending but the start of the next generation.
You should only ever pour water into the cup and never water the soil.
Fresh water in the central cup is essential, but the roots still take up moisture, so the mix needs watering once its surface has dried. Frequent flushing matters too, because liquid left standing turns stale and rots the crown. Both reservoirs deserve attention, and the cup water should always be fresh.