Houseplant · Araceae
Black Velvet Elephant Ear
Alocasia reginula 'Black Velvet'
A compact jewel alocasia whose near-black, silver-veined leaves reward precise, attentive care.
Bright indirect
USDA 10–12
18 in · 46 cm
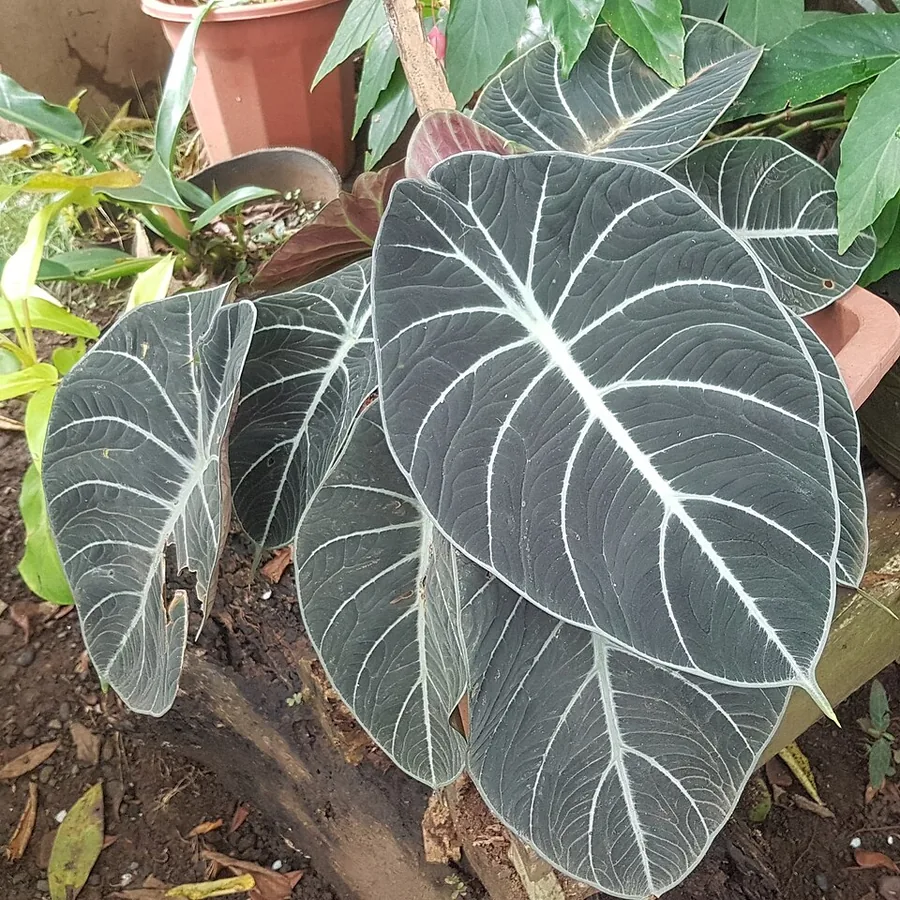
Overview
Among the small jewel alocasias, the Black Velvet stands out for its thick, almost black leaves laced with bright silver veins. Maturity tops out near 18 inches (46 cm) tall, so it reads as a tabletop specimen rather than the tall elephant ear that the name usually brings to mind. The plant sits within the aroid family and originates in the rainforests of Borneo.
Treat this as a plant for the gardener who enjoys getting the details right. Growth is slow, cold is poorly tolerated, and soggy soil triggers rot quickly, so success rests on reading the plant and restraining the watering can. Strike that balance and the dark, textured foliage ranks among the most arresting you can grow under a roof.
Note one safety point at the outset: every part carries calcium oxalate crystals that irritate mouth and skin tissue. The plant is genuinely toxic to pets and dangerous to young children, so position it beyond the reach of inquisitive mouths and paws.
Care
The short version: give it warmth, plenty of moisture in the air, and bright indirect light, then water with restraint so the upper half of the mix dries out between drinks. Too much water is what kills it fastest.
Light
Position it in bright, indirect light close to a window but shielded from the harsh midday rays that would burn the dark foliage. Partial shade is tolerated, yet thin light slows an already unhurried grower and mutes the velvety pigmentation.
Water
Most losses of this plant come down to watering. Allow the top half of the soil to dry before the next application, and pull back further in winter, since the genus rots quickly when left standing wet. Do not let the pot sit in a saucer of collected water.
Soil
Plant it in a moist but well-drained, organically rich mix that retains some moisture without turning to muck. Any pH between 5.0 to 8.0 is acceptable, though drainage outweighs the exact figure, because dense, water-retentive soil is precisely what brings on root rot.
Humidity
Count this as a high-humidity plant, most at ease in the moist air of a rainforest floor. Dry indoor conditions stress it and open the door to spider mites, so a humid corner, a pebble tray, or a compact humidifier earns its keep.
Feeding
Apply feed through the active growth of spring and summer and taper off or stop completely during winter dormancy. A seasonal rhythm fits its biology, since feeding a dormant plant accomplishes nothing.
Pruning
No shaping is called for. Simply remove dead, yellowed, or damaged leaves as they show up, which keeps the plant trim and removes shelter that pests would otherwise use.
Repotting
Repot only when the plant plainly demands it, as this cultivar dislikes disturbance and grows slowly. Aim for spring or summer, combine it with division if you want extra plants, and use fresh fast-draining mix each time to help fend off rot.
Overwintering
Ahead of the first autumn frost, relocate pots to a humid, cool spot around 60°F to 65°F (16°C to 18°C) and reduce watering. Freezing destroys the foliage, yet the plant rides out winter at rest and sends up new leaves once warmth returns.
Size & spacing
Anticipate a compact plant, up to about 18 inches (46 cm) tall when mature. Its slow rate and modest stature suit a shelf or tabletop far better than the floor.
Troubleshooting
Nearly every issue this plant develops leads back to water, humidity, or cold. Read the soil and the foliage as one picture, because a single symptom can mean too much moisture at the roots or too little in the air. Find the closest match below and respond early, before the trouble takes hold.
Soft, yellowing tissue that folds over while the potting mix is still damp
What you are seeing is root rot, the predictable result of too much water held in a heavy mix that starves the roots of oxygen. Slide the plant from its pot and examine the root ball: healthy roots stay firm and pale, while rotted ones go brown to black and squash between your fingers. Withhold water at once, cut away every soft root and the failed top growth, then settle the plant into a fresh, coarse, sharply draining medium.
Fix:
- Reduce watering immediately
- Repot into fresh, gritty, fast-draining medium
- Remove rotted roots and any collapsed growth
Brown blotches forming on foliage during long stretches of damp soil
Leaf spots develop when the mix stays wet for too long, and NC State groups them with root rot as twin markers of overwatering. The remedy is mechanical: water less frequently, open up drainage and air movement around the plant, and strip away the most disfigured foliage. Leaves that never sit damp give the pathogens nothing to work with, which is what halts the spread.
Fix:
- Reduce watering frequency
- Improve drainage and air circulation
- Remove badly affected leaves
Delicate webbing with a pale, stippled mottle over the leaf surface
You are dealing with spider mites, which colonize indoor foliage once the surrounding air dries out. Turn the leaves over and look for the pinpoint mites and their threads, both of which multiply fast under low humidity. Hose down the foliage, lift the moisture in the air around the plant, and keep treating on a schedule until no live mites remain.
Fix:
- Rinse foliage
- Raise humidity
- Treat as appropriate for spider mites
Tacky film and white fuzzy clumps gathering where leaves meet the stem
These signs point to mealybugs, often with scale insects in tow, and both prosper on plants kept indoors. Search the leaf axils and undersides for the waxy white colonies. Remove every visible insect, treat the population directly, and build inspection into your routine so a handful of survivors cannot rebuild their numbers.
Fix:
- Wipe off visible pests
- Treat infestation as appropriate
Foliage collapsing and shedding as temperatures begin to drop
More often than not this is cold damage and natural dormancy, not a death. Frost destroys the leaves, yet in mild zones the plant pushes new growth from the base once warmth returns, and a potted specimen overwinters indoors without trouble. Shift pots to a humid, cool position around 60°F to 65°F (16°C to 18°C) ahead of frost, scale back watering, and allow a resting period until growth resumes.
Fix:
- Bring pots indoors before frost to a humid, cool spot around 60-65°F
- Reduce watering over winter
- Allow the plant to rest and resume growth when warmth returns
Toxicity
Handle this as a toxic plant. All of its tissue carries insoluble calcium oxalate crystals, microscopic needle-like structures that scald the mouth and throat when chewed and redden and inflame skin where the sap touches it. Keep it firmly out of reach of pets, livestock, and young children, and wash your hands once you have worked with it.
Toxic to
Cats · Dogs · Horses · Rabbits · Livestock · Birds · People
Cats Moderate
The reaction hits a cat within moments of biting a leaf. Look for a stinging mouth, swollen lips, tongue, and throat, profuse drooling, vomiting, and obvious difficulty swallowing.
Dogs Moderate
A dog that chews any part suffers the same painful response: an inflamed, swollen mouth, drooling, pawing at the muzzle, vomiting, and labored swallowing.
Horses Moderate
In horses the oxalate crystals produce a tender, swollen mouth and throat with drooling and difficulty swallowing. Site the plant where no grazing animal can reach it.
Rabbits Toxic
The crystals that injure other animals make the plant unsafe for rabbits as well, so prevent any nibbling of the leaves entirely.
Livestock Toxic
Cattle, goats, and sheep face the same hazard. Because the calcium oxalate inflames the mouth and digestive tract, the plant belongs nowhere near grazing ground.
Birds Toxic
The crystals can injure pet birds too, so keep all foliage away from cages and perches.
People Caution
Nothing on this plant is edible. A bite produces a burning, swollen mouth, and contact with the sap can leave skin reddened and itchy, so wash your hands after handling and keep it out of reach of small children.
All parts contain calcium oxalate crystals; sap can cause contact dermatitis
Helpline numbers

United States
ASPCA Animal Poison Control: (888) 426-4435 (fee applies)
Poison Control: (800) 222-1222



Canada
Poison Centres: 1-844-764-7669
How to propagate
One dependable method exists for increasing this plant, and it asks for a careful touch rather than any specialized technique.
DivisionModerate
Spring to summer · Several weeks
Division is your reliable route, and NC State names separating offsets as the recommended method for alocasia. Carry it out in spring or summer, while the plant is actively growing. Lift the plant, work the rhizomes and offsets gently apart, pot each piece on its own, and allow several weeks for new roots to form before any fresh top growth appears.
Myths
A winter leaf drop means your alocasia is dead.
The dieback comes from cold and the plant's natural dormancy, and while it looks dramatic it seldom signals the end. Frost does kill the leaves, but in mild zones fresh growth emerges from the base when warmth returns, and a potted plant moved indoors will sprout again. Let it rest and hold off on tossing it.