
Introduction
Treating root rot requires speed because this disease kills plants in days. Pathogens can infect your roots in just 4 to 8 hours of soggy soil. University of California research shows how fast these water molds attack once your pot stays too wet.
I lost a 5 year old fiddle leaf fig to this problem before I knew what to look for. That painful lesson taught me how quickly plant root rot spreads through a collection. Every hour counts when you spot the first signs.
Root rot ranks among the worst houseplant diseases. It hides below the soil until serious damage shows up top. Farmers lose over 35 million bushels of soybeans each year to this disease. Your houseplants face the same pathogens that wipe out entire crop fields.
This guide covers the complete root rot treatment process from first symptoms to full recovery. You will learn exactly when to save a plant and when to cut your losses. Smart decisions now protect the rest of your collection from spread.
Signs and Symptoms of Root Rot
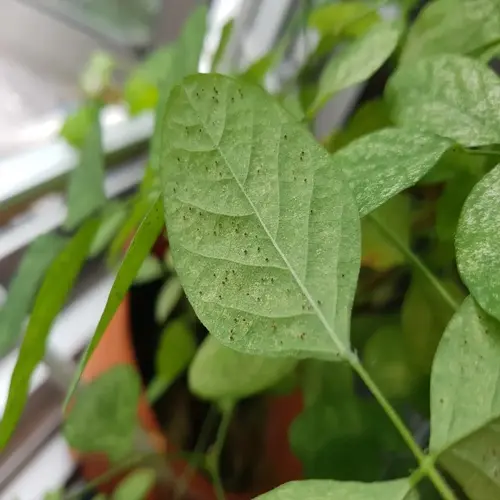
Root rot symptoms show up above ground long after the damage starts below. By the time you notice yellowing leaves or wilting plants, the infection has been spreading for weeks. I check my plants at the roots now because waiting for leaf symptoms often means waiting too long.
The signs of root rot follow a clear pattern from mild stress to total collapse. Penn State research lists 6 key symptoms: slowed growth, yellow older leaves that drop off, dead leaf edges, and brown roots. Watch for limp roots that bend without snapping. The outer root layer strips away from the core when touched.
Healthy roots feel like firm al dente pasta when you squeeze them between your fingers. Mushy roots feel like overcooked noodles that fall apart at a light touch. This simple squeeze test tells you more than any leaf symptom ever could about what happens underground.
The smell test works just as well when you suspect problems. Healthy roots have little to no odor while infected ones give off a rotten egg or swampy stink. If your plant smells bad when you unpot it, you found your answer.
Early Warning Signs
- Slowed Growth: Plants stop producing new leaves or stems even during active growing season when conditions seem favorable for healthy development.
- Subtle Wilting: Leaves droop slightly during midday heat but recover overnight, suggesting early stress before visible root damage appears.
- Color Changes: Older lower leaves begin yellowing from the edges inward while newer leaves remain green, indicating nutrient uptake problems.
Moderate Infection Signs
- Persistent Wilting: Leaves remain droopy even after watering because damaged roots cannot absorb moisture effectively despite available water in soil.
- Leaf Drop: Lower leaves yellow completely and fall off prematurely while the plant attempts to redirect limited resources to newer growth.
- Stunted Development: New growth appears smaller than normal with pale coloration and weak stems that struggle to support themselves.
Severe Root Rot Indicators
- Foul Odor: A distinct rotten egg or swampy smell rises from the soil when watering or when the plant is removed from its pot.
- Mushy Brown Roots: Roots appear dark brown or black with a soft mushy texture and the outer layer separates easily from the core when touched.
- Crown Softening: The base of the stem where it meets the soil feels soft and may show dark discoloration spreading upward.
Terminal Stage Symptoms
- Complete Collapse: The entire plant wilts severely with all leaves becoming limp, yellow, or brown regardless of watering attempts.
- Stem Rot Spread: Dark discoloration extends several inches up the main stem and the tissue feels hollow or water-soaked when pressed.
- Root System Loss: When unpotted, few to no white healthy roots remain and the entire root ball smells strongly of decay.
Common Root Rot Pathogens
Root rot pathogens come in different types that need different treatments. Think of them like flu strains where the same general symptoms come from different bugs. Pythium and Phytophthora look alike but they are water molds, not true fungi. Standard fungal root rot products often miss them.
I learned this the hard way when fungicide failed to save my monstera. The product killed Fusarium and Rhizoctonia just fine. But it did nothing against the Pythium that was eating my roots. Penn State research confirms that treatments work against groups of pathogens, not single species.
Each pathogen leaves clues you can spot during root checks. Pythium turns roots brown and black with that classic mushy texture where the outer layer peels right off. Phytophthora goes after root tips first and causes rapid soft decay that spreads upward fast. Water molds like these two need wet soil to swim and spread.
Rhizoctonia shows up as reddish brown thread growth wrapped around roots in warm, damp conditions. Fusarium reveals itself when you cut stems and find brown streaks in the tissue. Knowing which one attacked your plant helps you pick the right rescue plan.
Step-by-Step Root Rot Treatment
Root rot treatment works best when you catch it early and follow every step. Skipping parts of this process often leads to the infection coming back stronger. I save about 7 out of 10 plants when I catch problems early, but that drops to 3 out of 10 for advanced cases.
Before you start, decide if treatment makes sense for your plant. Wisconsin Extension research says discarding plants with heavy damage is often the smartest choice. Plants with more than half their roots gone rarely bounce back. Sometimes throwing one out protects your whole collection from spread.
You can save plant from root rot if you treat root rot at the first warning signs. Trim rotted roots, sterilize tools between cuts, and use fresh soil in a clean pot. Each step matters because pathogens hide in old soil. Expect 4 to 8 weeks of recovery time before new growth appears.
Remove and Assess the Plant
- Gentle Extraction: Carefully slide the plant from its pot without pulling on stems, tipping the pot sideways and supporting the root ball as it emerges.
- Shake Off Soil: Remove as much soil as possible by gently shaking and using your fingers to loosen soil clinging to roots.
- Root Inspection: Examine all roots closely and note what percentage appear healthy (white and firm) versus damaged (brown, black, or mushy).
- Decision Point: If more than half the roots are rotted or the crown base feels mushy, consider discarding the plant to prevent spreading disease.
Trim All Damaged Root Tissue
- Sterilize Tools: Clean scissors or pruning shears with 70% rubbing alcohol or 10% bleach solution for at least 30 seconds before cutting.
- Remove Rotted Roots: Cut away all brown, black, mushy, or foul-smelling roots until you reach firm white tissue.
- Cut Clean: Make cuts at least 0.5 inches (1.3 cm) above any discoloration to ensure you remove all infected tissue.
- Re-Sterilize: Clean your tools between plants or if you notice your cuts are revealing more rot deeper inside.
Treat Remaining Roots
- Rinse Thoroughly: Wash remaining roots under lukewarm running water to remove any clinging soil particles or fungal spores.
- Hydrogen Peroxide Soak: Prepare a solution of 1 part 3% hydrogen peroxide to 2 parts water and soak roots for 5-10 minutes.
- Air Dry: Allow roots to air dry for 30-60 minutes in a shaded location before repotting to reduce excess moisture.
- Optional Fungicide: Dust cut ends with cinnamon powder or apply a copper-based fungicide according to label directions.
Prepare Fresh Growing Medium
- New Container: Use a clean pot with drainage holes that is appropriate for the reduced root system size.
- Sterilize Reused Pots: Soak old pots in 10-15% bleach solution for about 1 hour then rinse well before use.
- Fresh Potting Mix: Always use new sterile potting soil and never reuse soil from infected plants.
- Improve Drainage: Add perlite or coarse sand to increase drainage if the original mix retained too much moisture.
Repot and Recovery Care
- Proper Planting Depth: Position the plant at the same depth it grew before and gently firm soil around remaining roots.
- Initial Watering: Water lightly to settle soil but avoid saturating since the reduced root system cannot absorb much moisture.
- Prune Foliage: Remove 30-50% of leaves to reduce water demand on the damaged root system during recovery.
- Recovery Timeline: Expect 4-8 weeks before seeing new growth as the plant focuses energy on rebuilding roots.
Hydrogen Peroxide Treatment Guide
Hydrogen peroxide for plants works because it releases oxygen that kills root rot pathogens. Most of these bugs need wet, low oxygen conditions to thrive. When H2O2 breaks down in the soil, it floods the root zone with oxygen and makes life hard for the bad guys.
I use 3% hydrogen peroxide from the drugstore for all my root rot treatments. The standard peroxide soak ratio is 1 part H2O2 to 2 parts water with a 5 to 10 minute soak time. Higher strength products exist but they can burn plant tissue if you mix them wrong.
A soil drench with hydrogen peroxide root rot treatment helps clear pathogens from the growing medium. Mix about 1 tablespoon per cup of water and water your plant as normal. This works great after repotting to knock down any spores that hitched a ride on the roots.
Keep in mind that H2O2 treatment is a helper, not a complete fix by itself. You still need to trim rotten roots, use fresh soil, and fix whatever caused the wet conditions. Repeat treatments no more than once every two weeks to avoid stressing the plant.
Biological and Chemical Controls
Trichoderma fungi offer a natural root rot treatment that also helps plants grow stronger. Studies show T. asperellum stopped 88% of plant disease in test trials. This biological control works by filling the soil with good fungi that crowd out the bad ones.
I add biocontrol agents to my potting mix now after seeing the research. Cabbage plants grew 417% larger when Trichoderma was in the soil. The good fungi help roots absorb more food and build tougher cell walls.
Chemical fungicide root rot products kill faster but you need to switch types often. Penn State says rotating FRAC classes stops pathogens from building resistance. Mefenoxam targets water molds but it skips true fungi.
Pick your weapon based on how bad things got. For mild cases, I grab Trichoderma products first. For severe rot, use a chemical fungicide then follow up with biocontrol agents to rebuild soil health.
Prevention Strategies
Root rot prevention works better than any treatment you can buy. Once pathogens get into your soil, they stick around for years waiting for wet conditions. I focus most of my energy on stopping problems before they start rather than fixing them after the damage hits.
Proper drainage matters more than anything else you can do for your plants. Well-draining soil lets water pass through fast so roots get air between drinks. Drainage holes at the bottom help but they are not enough if your soil mix holds too much water.
You can prevent root rot by checking the soil before each watering. Stick your finger about 1 to 1.5 inches deep and only water when that layer feels dry. This simple habit stops most overwatering problems before they become root rot disasters.
Terracotta pots help avoid overwatering because the porous clay pulls moisture out of the soil. I switched my tropicals to clay pots and saw fewer rot problems right away. The extra air flow through the pot walls keeps roots healthier between waterings.
Proper Watering Technique
- Soil Moisture Check: Insert your finger 1-1.5 inches (2.5-4 cm) into the soil before watering and only water when this depth feels dry.
- Water Thoroughly: When watering, soak until water drains from bottom holes then empty saucers after 15-30 minutes to prevent roots sitting in water.
- Seasonal Adjustment: Reduce watering frequency significantly during winter when plant growth slows and evaporation decreases.
Drainage Optimization
- Pot Selection: Choose containers with multiple drainage holes at the bottom and consider terracotta or unglazed clay which allows moisture to evaporate through pot walls.
- Soil Mix: Use well-draining potting mixes amended with perlite, coarse sand, or bark chips to create air pockets that prevent waterlogging.
- Avoid Gravel Layers: Never add rocks or gravel to pot bottoms as this creates a perched water table that keeps roots wetter, not drier.
Sanitation Practices
- Sterile Media: Always use fresh sterile potting mix from sealed bags rather than garden soil which may harbor root rot pathogens.
- Tool Cleaning: Sterilize cutting tools with 70% alcohol or 10% bleach solution for 30 seconds between plants to prevent cross-contamination.
- Pot Disinfection: Before reusing pots, soak them in 10-15% bleach solution for about 1 hour then rinse thoroughly.
Environmental Management
- Air Circulation: Provide good airflow around plants and avoid crowding which maintains high humidity at soil level.
- Appropriate Pot Size: Use pots only slightly larger than the root ball as excess soil holds moisture roots cannot use.
- Inspect New Plants: Quarantine new additions for 2-3 weeks and check roots before introducing them to your collection.
5 Common Myths
Adding rocks or gravel to the bottom of pots improves drainage and prevents root rot from developing in houseplants.
Gravel layers actually inhibit drainage by creating a perched water table where water accumulates above the gravel, keeping roots wetter and increasing root rot risk.
Yellow leaves always indicate root rot and you should immediately repot your plant when leaves start turning yellow.
Yellow leaves have many causes including nutrient deficiency, natural aging, and light stress, so check roots directly before assuming root rot is the problem.
Letting soil dry out completely between waterings will cure root rot without any other treatment being necessary.
Once root rot pathogens establish, drying soil alone cannot eliminate the infection because spores survive drought and reactivate when moisture returns.
Root rot only affects overwatered plants and cannot occur if you follow a strict watering schedule.
Root rot can develop from poor drainage, compacted soil, contaminated potting mix, or infected plant material even with proper watering practices.
All root rot is caused by the same fungus and any fungicide will effectively treat all root rot infections.
Different pathogens like Pythium, Phytophthora, Fusarium, and Rhizoctonia cause root rot and require different fungicide classes for effective treatment.
Conclusion
Treating root rot comes down to speed and following every step. Spot the symptoms early, trim all damaged roots, soak in hydrogen peroxide, and repot in fresh sterile soil. Miss any part of this sequence and the infection comes right back.
Prevention beats root rot treatment every time. Good plant care habits stop most problems before they start. Check your soil before watering, use well-draining mixes, and pick the right pots. Pathogens hide in soil for years so stopping them now saves you grief later.
Sometimes the smartest move is knowing when to let go. Plants with most of their roots gone rarely bounce back no matter how hard you try. Throwing out one sick plant protects your whole collection from spreading infection.
Pick one prevention tip from this guide and start using it today. Check your soil before the next watering or swap one plant into a terracotta pot. Save plants by catching problems early and acting fast when you spot the first warning signs.
External Sources
Frequently Asked Questions
Can plants recover from root rot?
Yes, plants can recover from root rot if caught early and treated promptly, but severely affected plants with more than half their roots damaged rarely survive.
Does hydrogen peroxide cure root rot?
Hydrogen peroxide can help treat root rot by killing pathogens and adding oxygen to roots, but it works best as part of a complete treatment including root trimming and repotting.
Can I use the same soil after root rot?
No, you should not reuse soil after root rot because fungal spores persist in contaminated soil and will reinfect new or recovering plants.
What does root rot look like?
Root rot appears as brown or black mushy roots with a foul smell, where the outer root layer easily separates from the inner core when touched.
Does baking soda cure root rot?
Baking soda is not effective for treating root rot because it cannot penetrate soil to reach root pathogens and has limited antifungal properties against root rot fungi.
How contagious is root rot?
Root rot is highly contagious and spreads through contaminated soil, water, tools, and even fungus gnats that carry spores from infected to healthy plants.
How long does root rot stay in soil?
Root rot pathogens can persist in soil for years as dormant spores, making soil sterilization or complete replacement necessary before reuse.
What chemical is used for root rot?
Fungicides containing mefenoxam, fosetyl-al, or propiconazole are commonly used for root rot, but proper diagnosis is essential as different chemicals target different pathogen groups.
Can cinnamon treat root rot?
Cinnamon has mild antifungal properties and can be dusted on trimmed roots as a preventive measure, but it cannot cure established root rot infections.
Should I throw away a plant with root rot?
You should throw away a plant if more than half the roots are affected, the crown or stem base is mushy, or if the plant shows no improvement after treatment.