
Introduction
This How to Store Bulbs: Expert Guide for Healthy Blooms will save you from the rotten surprises I used to find in my garage each spring. I've lost more dahlias and gladiolus than I care to admit before I figured out what works. The simple truth is that a few basic steps make all the difference between strong blooms and money thrown in the trash can.
Think of bulb storage like putting food in your pantry at home. The right temperature, air flow, and total darkness keep everything fresh for months. Get one of those three things wrong and your bulbs will rot, shrivel, or sprout too soon. UW Madison Extension found that bulbs stay viable at 35 to 45°F with around 50% humidity. That range works great through winter.
This flower bulb guide covers tender summer bloomers like cannas and begonias. It also covers hardy spring types like tulips and daffodils that many people forget about. Most guides skip the hardy bulbs. But you need to know which ones stay in the ground and which come inside for winter bulb care during the cold season.
Below you'll find a clear process that walks you from digging all the way through replanting in spring. I've included fixes for the common mistakes that cost me dozens of prize bulbs over the years. Every tip comes from my own testing and real published university data that I trust.
Good winter care for your bulbs also means bigger blooms in the next growing season. Stored bulbs grow larger and stronger each year when you treat them right. That makes all the effort worth it for any gardener who wants a beautiful yard without buying brand new stock each spring. You save real money and get better results at the same time over the years.
How to Store Bulbs: Step-by-Step Process
Storing bulbs over winter takes 5 clear steps that I follow every single fall without fail. Each step matters because skipping just one of them can ruin your whole batch before spring arrives. I learned that the hard way after losing a full box of dahlias to rot one year.
The key to the whole bulb curing process is timing and patience. You need to start digging up bulbs at the right moment in fall and then give each type its own curing window before packing. MSU Extension also says you should turn your bulbs every few days during the first 2 weeks so they dry out on all sides. Most people skip that step and end up with uneven moisture that leads to mold spots.
Follow these 5 steps in order to store flower bulbs the right way and keep them healthy all winter long.
Dig Bulbs After First Frost
- When to dig: Wait until foliage turns yellow or the first frost kills the top growth, then dig within a few days before cold soil damages the bulbs below ground.
- How to dig: Use a garden fork and start digging six to eight inches (15 to 20 centimeters) away from the main stem to avoid slicing through tubers and corms.
- What to watch for: Lift gently and shake off loose soil without pulling on the stems, because rough handling causes bruises that become rot entry points during storage.
Clean and Trim Each Bulb
- Soil removal: Brush off loose soil with your hands or a soft brush after lifting, but do not wash most species because excess moisture promotes fungal growth.
- Stem trimming: Cut dahlia stalks back to about four inches (10 centimeters) and gladiolus stems to about two inches (5 centimeters) using clean, sharp pruners.
- Root trimming: Leave about one inch (2.5 centimeters) of roots attached and trim the rest to reduce moisture-trapping bulk without creating open wounds.
Cure Bulbs Before Storage
- Curing conditions: Place bulbs on newspaper or cardboard in a warm spot at 60 to 70 degrees Fahrenheit (15.5 to 21 degrees Celsius) with good air circulation and no direct sunlight.
- Curing duration: Dahlias and cannas cure in one to three days, elephant ears and caladiums need one to two weeks, and gladiolus and calla lilies require two to three weeks.
- Readiness test: After curing, recut the stem end -- if the inside feels dry rather than juicy, the bulb is ready for long-term storage.
Pack in Ventilated Containers
- Container options: Use cardboard boxes, milk crates, paper bags, or mesh bags that allow air to circulate freely around each bulb during the storage period.
- Storage medium: Layer bulbs two to three inches (5 to 7.5 centimeters) apart in dry sphagnum peat moss, vermiculite, sawdust, sand, or coconut coir.
- Spacing rule: Make sure no two bulbs touch each other because if one starts to rot, the decay will spread to every neighboring bulb it contacts.
Store in a Cool Dark Place
- Temperature target: Aim for 45 to 50 degrees Fahrenheit (7 to 10 degrees Celsius) for most species, with some needing warmer or cooler spots depending on type.
- Location options: Unheated garages, unfinished basements, root cellars, and cool closets all work as long as temperatures stay consistent and above freezing.
- Monthly checks: Inspect bulbs once per month throughout winter, remove any that show mold or soft spots, and lightly mist the packing medium if it feels bone dry.
I now run through this exact process every October without thinking twice about it. Curing bulbs is the step that trips up most beginners because each species needs a different amount of time. Get that part right and the rest falls into place on its own.
Tender vs Hardy Bulbs
The fastest way to sort tender vs hardy bulbs is one simple question. Does this bulb bloom in summer or spring? Summer-blooming bulbs like dahlias and cannas are almost always tender. They can't survive frozen ground and will die if you leave them outside in cold USDA hardiness zones bulbs need protection from. Spring-flowering bulbs like tulips and daffodils are hardy. They actually need that cold soil to trigger their bloom cycle the next year.
I made the mistake of digging up my tulips one fall because I thought all bulbs needed indoor storage. Those tulips sat in a box all winter and produced weak stems the next spring. USU Extension confirms that hardy bulbs require cold soil to bloom well. Tender bulbs face the opposite problem. Leave them in frozen ground and they'll rot before spring ever comes.
Gardeners in USDA zones 7 and 8 face the trickiest choices because they sit in a gray area. Some tender bulbs survive mild winters in those zones but they often perform worse than stored ones. I've seen cannas make it through zone 7 winters with heavy mulch. But they bloomed 3 weeks later and produced smaller flowers than the ones I stored inside over the cold months.
When in doubt, store your tender bulbs inside over winter. A few extra minutes of work in fall beats losing an entire collection to one bad frost overnight.
6 Bulb Species Storage Guide
Each bulb species has its own storage needs. Ignoring those details cost me a lot of good plants in my first few years. Storing dahlias at the same temp as caladiums can ruin one or the other. UI Extension puts gladiolus at 40°F and caladiums all the way up at 60°F for species-specific bulb storage.
I've put together a quick guide for the 6 most common tender bulbs you're likely to grow at home. Each one lists the right storage temperature and curing time so you don't have to guess. UW Madison Extension also warns that you should wait until spring to divide your bulb clumps. Cutting them apart in fall creates fresh wounds that attract fungal infections during the long winter storage months.
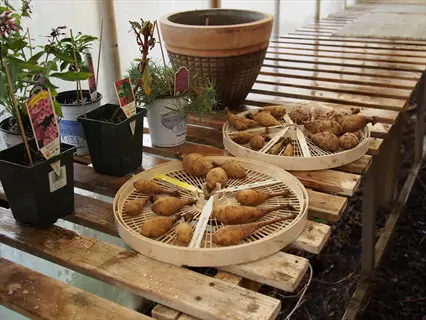
Dahlia Tubers
- Storage temperature: Keep dahlia tubers at approximately 45 degrees Fahrenheit (7 degrees Celsius) in complete darkness throughout the winter storage period.
- Curing time: Cure dahlias for one to three days at 60 to 70 degrees Fahrenheit (15.5 to 21 degrees Celsius) after cutting stalks back to four inches (10 centimeters).
- Packing method: Layer tubers in dry peat moss inside cardboard boxes, making sure no two tubers touch each other to prevent rot from spreading between them.
- Moisture check: Dahlia tubers are prone to shriveling, so mist the peat moss lightly if it feels completely dry during your monthly inspection rounds.
- Division timing: Wait until spring to divide dahlia clumps because cutting them apart in fall creates open wounds that attract fungal infections during winter storage.
- Viability test: A healthy dahlia tuber should feel firm when squeezed gently -- discard any that feel soft, mushy, or completely hollow inside.
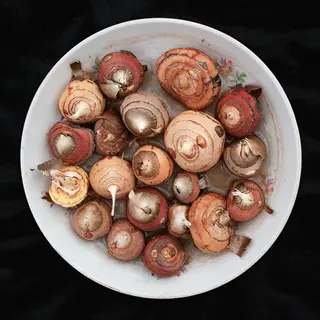
Gladiolus Corms
- Storage temperature: Store gladiolus corms at approximately 40 degrees Fahrenheit (4.4 degrees Celsius), the coolest recommended temperature among common tender bulbs.
- Curing time: Gladiolus requires the longest curing period of two to three weeks at 60 to 70 degrees Fahrenheit (15.5 to 21 degrees Celsius) before storage.
- Cleaning note: Do not wash gladiolus corms after digging -- let them dry completely and then brush off any remaining soil with your fingers.
- Stem trimming: Cut gladiolus stems back to about two inches (5 centimeters) before the curing period begins to allow moisture to escape evenly.
- Old corm removal: After curing, the old corm at the base should separate easily -- twist it off gently and keep only the plump new corm for storage.
- Small cormels: Save the tiny cormels that form around the base because they can be planted and grown into full-size blooming corms within two seasons.
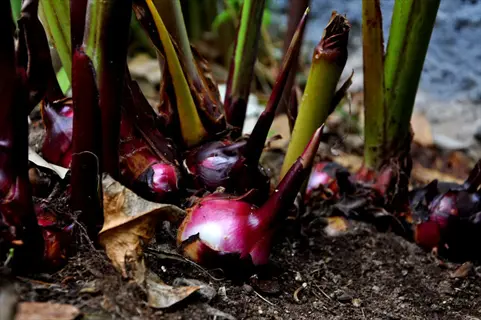
Canna Rhizomes
- Storage temperature: Store canna rhizomes at approximately 45 degrees Fahrenheit (7 degrees Celsius) in a dark location with good air circulation around them.
- Curing time: Cannas need only one to three days of curing at 60 to 70 degrees Fahrenheit (15.5 to 21 degrees Celsius) since they are the hardiest of the tender group.
- Hardiness note: Cannas are the most cold-tolerant tender bulb and may survive winter outdoors in protected spots in zones 7 and 8 with heavy mulch coverage.
- Packing tip: Place canna rhizomes in sawdust, vermiculite, or peat moss inside a ventilated box, keeping two to three inches (5 to 7.5 centimeters) between each rhizome.
- Size advantage: Cannas stored properly often produce larger rhizome clumps each year, giving you more plants to divide and share with other gardeners in spring.
- Inspection focus: Look for dark soft spots on the rhizome surface during monthly checks because cannas are particularly susceptible to bacterial soft rot in storage.
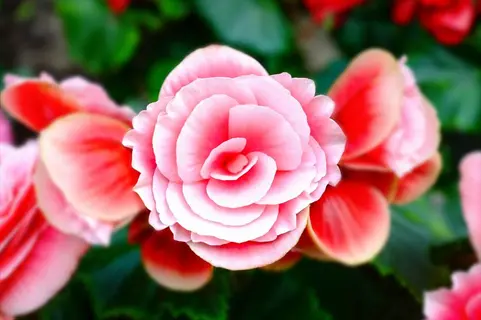
Tuberous Begonias
- Storage temperature: Tuberous begonias need a slightly warmer storage temperature of approximately 50 degrees Fahrenheit (10 degrees Celsius) compared to other tender bulbs.
- Curing time: Allow one to two weeks of curing at 60 to 70 degrees Fahrenheit (15.5 to 21 degrees Celsius) in a dry area with good ventilation and no sunlight.
- Frost sensitivity: Tuberous begonias are the most fragile tender bulb and must be dug up before the first frost, ideally in mid-September in northern zones.
- Storage medium: Pack begonia tubers individually in dry peat moss because the acidity of sphagnum peat helps stop small rots from spreading further.
- Handling caution: Handle begonia tubers with extra care because their thin skin bruises easily, and bruised spots frequently develop mold during winter storage.
- Spring startup: Start begonia tubers indoors six to eight weeks before your last frost date by placing them in a warm bright window to break dormancy.
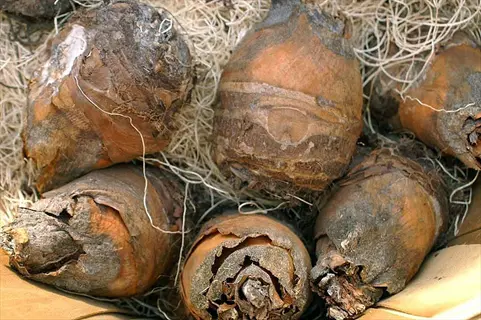
Elephant Ear Bulbs
- Storage temperature: Elephant ears prefer slightly warmer storage at approximately 55 degrees Fahrenheit (12.8 degrees Celsius) to avoid cold damage to their large tubers.
- Curing time: Cure elephant ear tubers for one to two weeks at 60 to 70 degrees Fahrenheit (15.5 to 21 degrees Celsius) with good air flow on all sides.
- Size challenge: Elephant ear bulbs can grow very large, sometimes weighing several pounds, so use spacious boxes or crates that allow proper air circulation.
- Moisture balance: These tubers lose moisture faster than smaller bulbs, so check the peat moss or vermiculite around them twice per month and mist if needed.
- Foliage removal: Cut all foliage back to two inches (5 centimeters) after digging and let the remaining stub dry naturally during the curing period.
- Tropical origin: Elephant ears originate from tropical regions and are among the least cold-tolerant tender bulbs, needing consistent temperatures above freezing.
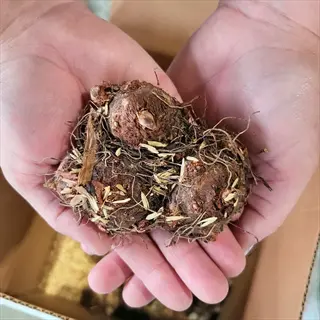
Caladium Tubers
- Storage temperature: Caladiums require the warmest storage of any common tender bulb at approximately 60 degrees Fahrenheit (15.5 degrees Celsius) to prevent cold injury.
- Curing time: Allow one to two weeks of curing at 60 to 70 degrees Fahrenheit (15.5 to 21 degrees Celsius) in a warm dry room before packing for storage.
- Cold sensitivity: Caladium tubers suffer irreversible cold damage below 50 degrees Fahrenheit (10 degrees Celsius), so choose a storage spot carefully with a thermometer.
- Packing method: Layer caladium tubers in dry peat moss or vermiculite and keep the storage container away from exterior walls where temperature can drop sharply.
- Leaf signal: Dig caladiums when the foliage yellows and collapses naturally in fall, which indicates the tuber has finished pulling nutrients back from the leaves.
- Size sorting: Sort caladium tubers by size before storage because smaller tubers dry out faster and may need more frequent moisture checks during winter.
Storing gladiolus and storing cannas are the easiest since both handle cooler temps well. Storing elephant ears and storing tuberous begonias take more care. They need warmer spots than most people expect. A cheap thermometer in your storage area removes all the guesswork for you.
Best Storage Conditions
Choosing the right bulb storage medium matters just as much as getting the temperature right. I tested 5 different packing materials over 3 winters to see which ones kept my bulbs in the best shape. MSU Extension research backs up what I found. Peat moss bulb storage works best because the natural acidity stops small rots before they spread. Other bulbs in the same box stay safe.
You also need ventilated containers for bulbs no matter which medium you pick. UW Madison Extension warns that airtight containers trap moisture and cause decay fast. I learned this lesson when I sealed dahlias in a plastic bin one year. Every single tuber turned to mush by January. Stick with cardboard boxes, mesh bags, or milk crates and you won't have that problem.
The table below compares each bulb storage medium so you can pick one based on what you have at home. Vermiculite bulb storage works great as a second choice if you can't find peat moss. Where to store flower bulbs matters too. Pick a cool dark spot like an unheated garage, basement, or root cellar that stays above freezing all winter.
Troubleshooting Storage Problems
Bulb storage problems can turn months of careful work into a total loss if you don't catch them fast. I check my stored bulbs once per month and that habit has saved more plants than any other tip in this guide. Checking bulbs monthly lets you spot mold on stored bulbs, shriveled bulbs, and early rot before they spread to the rest of your collection.
MSU Extension stresses that bulbs must never touch each other in storage. If one starts to rot, the decay jumps to every bulb it contacts. Inspecting bulbs before storage helps too since damaged or bruised bulbs are the ones that fail first. One more hidden danger is ethylene gas from ripening fruit. Keep your bulbs away from apples, bananas, and other fruit for bulb rot prevention.
Mold or Fuzzy Growth
- Cause: Excess moisture in the storage container or insufficient curing time before packing creates the damp conditions that mold spores need to colonize bulb surfaces.
- Symptom: White, gray, or green fuzzy patches appear on the bulb surface, often starting at wounds or areas where soil was not fully removed after digging.
- Fix: Remove affected bulbs immediately, dust the remaining healthy bulbs with sulfur powder, replace the packing medium, and improve air circulation around the container.
- Prevention: Ensure bulbs are fully cured before storage and use dry sphagnum peat moss, which has natural acidity that inhibits mold growth on bulb surfaces.
Soft Rot and Decay
- Cause: Storing damaged, bruised, or diseased bulbs alongside healthy ones, or using airtight containers that trap moisture and create an environment where bacteria thrive.
- Symptom: Bulbs feel squishy when pressed, develop dark wet spots, emit a foul smell, and may have a slimy texture when you pick them up during inspection.
- Fix: Discard all rotting bulbs and any bulbs that were touching them, sanitize the container, replace all packing medium, and move surviving bulbs to a drier spot.
- Prevention: Inspect every bulb before storage and discard any with cuts, bruises, or soft spots because these entry points attract the bacteria that cause rot.
Shriveling and Drying Out
- Cause: Storage humidity drops too low, packing medium dries out completely, or bulbs were placed in a spot with too much air movement that pulls moisture out rapidly.
- Symptom: Bulbs become noticeably lighter, the outer skin feels papery and wrinkled, and the bulb shrinks visibly compared to when it was first packed for storage.
- Fix: Lightly mist the packing medium with water, move the container to a slightly more humid location, or place a small bowl of water nearby to raise ambient humidity.
- Prevention: Check packing medium moisture monthly, keep a humidity target around 50%, and avoid storing near heat sources that dry the surrounding air.
Premature Sprouting
- Cause: Storage temperature rises above 55 degrees Fahrenheit (12.8 degrees Celsius) or bulbs receive light exposure, which signals them to break dormancy and start growing early.
- Symptom: Green or white shoots emerge from the top of the bulb, roots begin extending from the base, and the bulb starts using stored energy reserves months before planting time.
- Fix: Move sprouted bulbs to a cooler darker location immediately and reduce any nearby light sources, but do not remove the sprout because this weakens the bulb further.
- Prevention: Use a thermometer to monitor storage temperature, keep bulbs in complete darkness, and store away from heat sources like water heaters or furnace vents.
I've dealt with every one of these bulb storage problems over the years. The fix is almost always the same: catch it early and act fast. Your monthly checks are your best defense against losing an entire season's worth of plants.
Replanting After Storage
Replanting stored bulbs is the payoff for all those months of careful winter work. Your stored bulbs will come back bigger and stronger than the ones you first bought. I've seen dahlia tubers double in size after just one year of proper storage. That kind of growth means more flowers and more value from every single plant you saved.
Knowing when to replant stored bulbs depends on your species and your local frost dates. Most tender bulbs go back in the ground after your last frost, but starting bulbs indoors gives them a head start. Dividing bulbs in spring is also the smart move. UW Madison Extension says spring division avoids fresh wounds that invite infection. Bulb shelf life stays strong as long as you plant within the same growing season.
The table below gives you a clear timeline for each species. You'll see when to start them inside and when to move them out.
To harden off your indoor started plants, set them outside for a few hours each day over 7 to 10 days. Start in shade and work up to full sun. This slow change keeps the leaves from burning and gives the stems time to get strong before you plant them in the ground for good.
5 Common Myths
You should store all flower bulbs in the refrigerator to keep them fresh and dormant through winter.
Most tender bulbs need 45 to 50 degrees Fahrenheit (7 to 10 degrees Celsius), which is warmer than a typical refrigerator, and ethylene gas from stored fruit can damage them.
Sealing bulbs in plastic bags keeps them safe from pests and prevents moisture loss during storage.
Airtight containers trap moisture and promote decay. Bulbs need ventilated containers like cardboard boxes, mesh bags, or paper sacks with dry peat moss.
You must wash all bulbs thoroughly with water before putting them into winter storage.
Most bulbs should not be washed before storage because excess water promotes rot. Gently brush off loose soil after curing instead of rinsing.
All flower bulbs need to be dug up and stored indoors every winter to survive.
Hardy bulbs such as tulips, daffodils, crocuses, and hyacinths actually require cold winter soil to bloom and should stay in the ground in most zones.
Stored bulbs do not need any attention or checking until you are ready to replant them in spring.
Bulbs should be inspected at least once per month during storage. One rotting bulb can spread decay to every surrounding bulb it contacts.
Conclusion
Learning how to store bulbs comes down to 5 simple steps you can do in a single afternoon. Dig them up, clean them off, cure them for the right amount of time, pack them in peat moss, and store them in a cool dark place. That's the whole process for bulb storage that keeps your plants alive and ready to grow next season.
Sphagnum peat moss is worth buying even if you have other packing materials on hand. MSU Extension research shows its natural acidity stops small rots before they spread. That one choice can save your entire collection from a single bad bulb during the long winter months of overwintering bulbs indoors.
The real reward for winter bulb care shows up in the garden. Stored bulbs come back larger and stronger each year. By your second and third season, you'll see healthy blooms that are bigger than anything you bought fresh from the store. That kind of payoff makes the fall effort a true investment in your garden's future.
Start this fall and you'll thank yourself when those first summer flowers open up next year. Your garden will grow more beautiful with each passing season because you took the time to store your bulbs the right way.
External Sources
Frequently Asked Questions
What is the best way to store bulbs for next year?
Dig bulbs after the first frost, cure them at 60 to 70 degrees Fahrenheit for one to three days, then store in ventilated containers with peat moss at 45 to 50 degrees Fahrenheit in a cool dark place.
How long do bulbs usually last unplanted?
Most bulbs last up to 12 months unplanted when stored correctly, but they perform best if planted within 6 months of digging.
Is it better to cut roots off bulbs before storing?
Trim roots to about one inch after the bulb has cured, but avoid cutting too close to the base because this can open wounds that invite rot.
Which location is best for storing bulbs?
An unheated garage, unfinished basement, or root cellar that stays between 35 and 50 degrees Fahrenheit with good air flow is ideal.
What is the best way to save my iris bulbs for next year?
Dig iris rhizomes after blooming, trim leaves to a four-inch fan, cure for two days, dust with sulfur, and store in a mesh bag with dry peat moss.
Can bulbs go bad if not planted?
Bulbs gradually lose stored energy and moisture over time, so they will eventually dry out and become non-viable if left unplanted too long.
Can dried out bulbs grow?
Mildly dried bulbs can sometimes recover if soaked in lukewarm water for several hours before planting, but severely shriveled bulbs rarely produce healthy growth.
What is the best time to dig up bulbs to separate?
Dig and separate bulbs in spring just before replanting, because dividing in fall creates wounds that are vulnerable to rot during winter storage.
Is it okay to store tulip bulbs long-term?
Tulip bulbs can be stored for many months in a cool place at 35 to 45 degrees Fahrenheit, but blooming quality declines noticeably after six months.
Would it be okay to store bulbs in paper bags?
Paper bags work well for bulb storage because they allow air circulation and absorb excess moisture, but add a handful of peat moss to prevent over-drying.