
Introduction
You want more plants but don't want to spend cash at the store each week. Learning How to Propagate Pothos in 3 Simple Steps gives you free plants from a vine you already own at home. It's the easiest houseplant propagate method out there. Brand new growers get quick and solid results without any fancy tools or gear at all.
I got my first golden vine from a coworker about 6 years ago and it changed how I think about indoor plants for good. That one vine gave me over 30 new ones through pothos propagation over time. They now sit on my shelves, desks, and windowsills all over my home. UW Madison Extension says this plant roots in water within 3 to 4 weeks. Buds show up in just 1 to 2 weeks when conditions are warm enough for strong growth to begin.
Here's a fact most people miss about this trailing vine. A 2016 study found it lacks the genes for flowering. That means it can't make seeds at all. Stem cuttings are the only way this plant grows and spreads in the real world. Think of it like copying a file on your computer. You get an identical plant from a small piece of the original each time you try it.
Below you'll find 3 clear steps to get going right away with your first batch of cuttings. You'll also get tips on the best varieties to pick and the right time of year to cut your vines. I cover fixes for mistakes that trip up new plant growers too.
3 Simple Steps to Propagate Pothos
You can propagate pothos step by step with just a glass jar, clean scissors, and a healthy vine. The whole process breaks down into 3 stages: take your pothos stem cutting, root it in water or soil, then move it to a pot once roots form. Each stage takes just a few minutes of work on your end.
The key to success is finding the pothos node on each vine before you cut. A leaf node pothos growers look for appears as a small brown bump where a leaf meets the stem. Roots can only grow from these nodes. If you cut a section without one, that piece will never root no matter what you do. I learned this the hard way when my first 3 cuttings failed because I had no idea where to cut pothos vines at all.
Gather Your Materials First
- For water propagation: Prepare a clean glass jar or vase, room temperature water, sterilized scissors or pruning shears, and rubbing alcohol or a 10% bleach solution for tool sterilization.
- For soil propagation: Collect a small pot with drainage holes, well-draining potting mix (peat moss, perlite, and standard potting soil), a clear plastic bag for humidity, and sterilized cutting tools.
- Workspace setup: Lay down newspaper or a cutting mat because pothos sap contains calcium oxalate crystals that can irritate skin, and wear gloves if you have sensitive skin or plan to handle many cuttings.
- Choose the right parent plant: Select a healthy, actively growing pothos vine at least 12 inches (30 centimeters) long with multiple nodes and no signs of yellowing, wilting, or pest damage.
Step 1: Take Your Cuttings
- What to look for: Find a healthy vine with vibrant leaves and locate the small brown bumps called nodes where leaves attach to the stem, as roots only grow from these points.
- Cutting length: Use clean, sterilized scissors or pruners to snip 3 to 5 inches (7.5 to 12.5 centimeters) of vine, making sure each cutting has at least two healthy leaves and one or two nodes.
- Where to cut: Position your cut about half an inch (1.3 centimeters) below a leaf node, and remove the bottom leaf so the exposed node can be submerged in water or buried in soil.
- Tool preparation: Sterilize your cutting tools with rubbing alcohol or a 10% bleach solution before making any cuts to prevent transferring bacteria or disease to the fresh wound.
Step 2: Root in Water or Soil
- Water method: Place cuttings in a clear glass jar with room temperature water, submerging at least one node while keeping all leaves above the waterline to prevent rot.
- Soil method: Dip the cut end into pre-moistened well-draining potting mix, burying at least one node about 1 inch (2.5 centimeters) deep and firming the soil around the stem.
- Water maintenance: Change the water every 3 to 5 days to prevent bacterial growth and maintain oxygen levels, and keep the container in bright indirect light at 70 to 90 degrees Fahrenheit (21 to 32 degrees Celsius).
- Soil moisture: Keep soil consistently damp but not waterlogged for cuttings rooted directly in soil, and consider covering the pot with a clear plastic bag to maintain humidity above 60%.
Step 3: Transplant to Soil
- When to transplant: Move water-rooted cuttings to soil once roots reach 1 to 2 inches (2.5 to 5 centimeters) in length, which typically takes 3 to 4 weeks at warm temperatures.
- Soil preparation: Use a well-draining potting mix with a pH between 6.5 and 7.0, such as a blend of peat moss, perlite, and standard potting soil in equal parts.
- Planting depth: Create a hole deep enough to bury all roots without bending them, gently fill with soil, and water thoroughly until moisture drains from the bottom of the pot.
- Transition care: Water-grown roots need 1 to 2 weeks to adapt to soil, so keep the soil consistently moist during this period and avoid direct sunlight until the plant shows new growth.
Most people get great results on their very first try with these 3 steps. The biggest mistake I see is people rushing the transplant before roots grow long enough. Wait for those roots to hit at least 1 to 2 inches before you move them to soil.
Water vs Soil Propagation
Both methods work well for pothos, but each one has clear pros and cons you should know about. Pothos water propagation lets you watch roots grow in real time through a glass jar. When you propagate pothos in soil, the roots come out stronger from the start. Your choice comes down to what matters more to you: ease or root strength.
I've tested both ways on over 50 cuttings across 4 years. Rooting pothos in water gave me visible roots in about 3 weeks every time. When I chose to propagate pothos in water, I could spot problems before they got bad. Soil rooting vs water rooting showed one clear gap. Water roots are thinner and more fragile than soil roots. They need time to adapt after you move them to a pot.
UF/IFAS data shows buds break in 2 to 3 weeks and full rooting takes 3 to 4 weeks at 70 to 90°F. UW Madison confirms the same timeline in water or vermiculite. A bioRxiv study even found that Aloe vera gel helped roots form 16.67% faster than store bought rooting powder. So you don't need any special products to get strong results. Just pick your method from the table below and use a well-draining potting mix when it's time to plant.
My advice for brand new growers is to start with water propagation first. You'll learn how roots develop and gain confidence before trying the soil method on your next round of cuttings.
6 Pothos Varieties to Propagate
Not all pothos varieties propagation speeds are the same. The types of pothos you own will change how long you wait for roots to show up. Solid green types like Jade root the fastest because they pack more chlorophyll into each leaf. Variegated types like marble queen pothos take longer because their white patches can't make energy from light.
I've grown 5 of these 6 varieties from cuttings in my own home over the years. Golden pothos propagation is hands down the easiest place to start for you. Neon pothos and devil's ivy propagation offer fun color options for your collection too. Each variety below has its own rooting speed and tips so you know what to expect before you make your cuts.
Golden Pothos
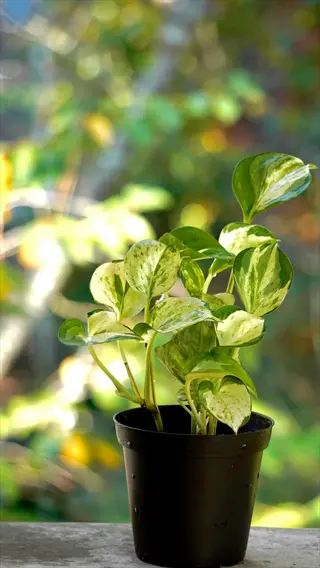
- Growth speed: Golden Pothos is the fastest-growing variety and roots in water within 2 to 3 weeks under optimal conditions, making it the best choice for first-time propagators.
- Appearance: Heart-shaped leaves display a mix of bright green and golden yellow variegation, with each leaf showing a unique pattern that becomes more pronounced in brighter light.
- Propagation tip: This variety produces strong aerial roots at each node, which gives cuttings a head start when placed in water because those roots begin absorbing moisture right away.
- Light needs: Golden Pothos tolerates a wide range of light from low to bright indirect, but cuttings root fastest near a window with filtered sunlight.
- Hardiness: As the most forgiving pothos variety, Golden Pothos can survive occasional missed water changes and temperature fluctuations during the rooting process.
- Best for: Beginners who want guaranteed success with their first propagation attempt and anyone looking to quickly fill a pot with multiple rooted cuttings.
Marble Queen Pothos
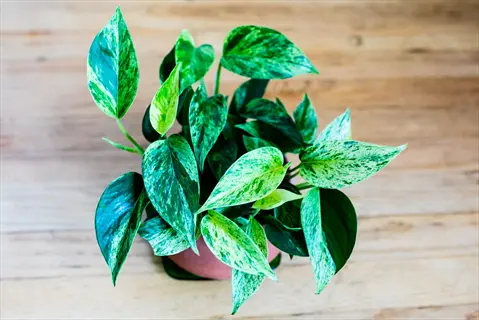
- Growth speed: Marble Queen roots at a slower pace than solid green varieties, typically taking 4 to 6 weeks because its heavy white variegation produces less chlorophyll for energy.
- Appearance: Striking white and green marbled leaves make this one of the most decorative pothos varieties, though new cuttings may produce more green leaves at first.
- Propagation tip: Select cuttings with a balanced mix of green and white because fully white leaves cannot photosynthesize and will not support root development on their own.
- Light needs: Marble Queen requires brighter indirect light than solid green varieties to maintain its variegation pattern and provide enough energy for root growth.
- Hardiness: This variety is more sensitive to cold temperatures during propagation, so keep water or soil temperature above 70°F (21°C) at all times.
- Best for: Intermediate plant parents who enjoy watching variegation patterns develop and want a more decorative trailing plant for shelves and hanging baskets.
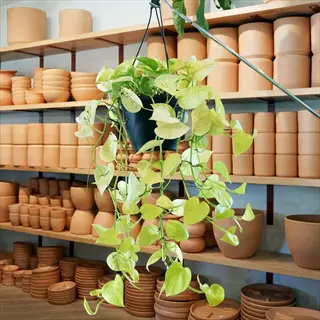
Neon Pothos
- Growth speed: Neon Pothos roots at a similar speed to Golden Pothos, often within 3 to 4 weeks, because its solid chartreuse leaves produce plenty of chlorophyll.
- Appearance: Bright chartreuse to lime green leaves with no variegation pattern create a bold, eye-catching display that stands out among other houseplants.
- Propagation tip: Choose cuttings from the newest growth at vine tips for the brightest color, as older leaves tend to darken to a deeper green over time.
- Light needs: Medium to bright indirect light keeps the signature neon color vibrant, while low light conditions cause leaves to fade toward a standard green.
- Hardiness: Neon Pothos is almost as tough as Golden Pothos and handles the propagation process with minimal fuss, even tolerating a bit cooler room temperatures than most.
- Best for: Anyone who wants a fast-rooting variety with a unique color that adds brightness to rooms without relying on flowers or variegation patterns.
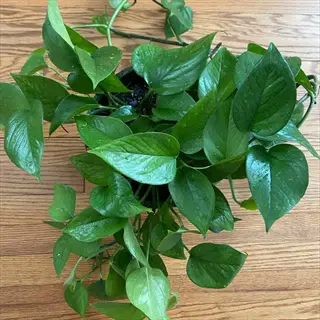
Jade Pothos
- Growth speed: Jade Pothos is one of the fastest rooters at 2 to 3 weeks because its solid dark green leaves contain the most chlorophyll of any pothos variety.
- Appearance: Deep, rich green leaves without any variegation give Jade Pothos a clean, classic look that works well in both modern and traditional room settings.
- Propagation tip: This variety is the most reliable for propagation success since every cutting receives maximum photosynthetic energy to fuel rapid root development.
- Light needs: Jade Pothos performs well in lower light conditions compared to variegated types, making it an excellent choice for propagation in rooms with limited natural light.
- Hardiness: As the most resilient pothos variety, Jade handles temperature fluctuations, inconsistent watering, and less-than-ideal light without slowing root growth much at all.
- Best for: Offices, bathrooms, and other spaces with limited light where you want a lush, trailing plant that propagates quickly and reliably.
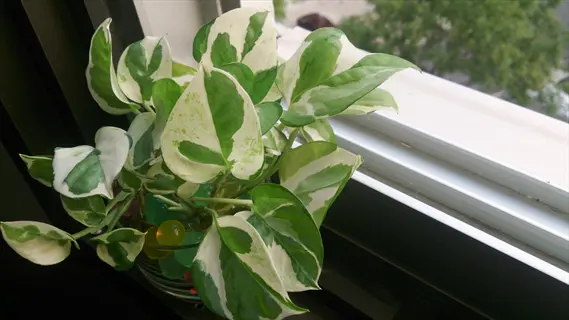
Pearls and Jade Pothos
- Growth speed: Pearls and Jade grows and roots more slowly than solid varieties, often requiring 4 to 5 weeks for visible root development due to smaller leaves and compact growth habit.
- Appearance: Small, compact leaves feature splashes of white, green, and sometimes gray, creating a delicate spotted pattern that differs from the bold streaks of Marble Queen.
- Propagation tip: Take a bit longer cuttings with 3 to 4 nodes because this compact variety produces shorter internodes, and extra nodes give more potential rooting points.
- Light needs: Bright indirect light is essential to maintain the detailed variegation pattern and provide enough energy for the smaller leaves to support root growth.
- Hardiness: This patented variety is somewhat more delicate during propagation, so keep temperatures steady and avoid placing cuttings near cold drafts or heating vents.
- Best for: Collectors looking for a more refined, compact pothos that looks great in small pots, terrariums, and tight shelf spaces.
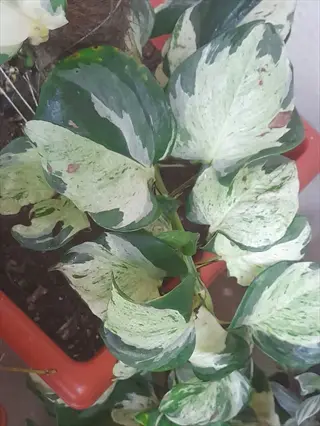
Manjula Pothos
- Growth speed: Manjula is one of the slowest pothos varieties to root, often needing 5 to 6 weeks because its heavy cream and white variegation limits photosynthetic capacity.
- Appearance: Wide, rounded leaves with swirling patterns of cream, white, silver, and green set Manjula apart as one of the most visually striking pothos cultivars available.
- Propagation tip: Always select cuttings that include at least 50% green coloring on the leaves, as all white cuttings often fail to produce enough energy to generate roots.
- Light needs: Manjula needs the brightest indirect light of any pothos variety to maintain its unique coloring and support the extra energy demands of rooting new cuttings.
- Hardiness: This variety requires more careful attention during propagation, including stable temperatures above 70°F (21°C) and steady indirect light all day.
- Best for: Experienced plant propagators who enjoy a challenge and want to add a rare, eye-catching variety to their collection.
Start with Golden or Jade if you're new to this whole process. Once you get those rooting down, move on to the variegated types for a bigger challenge. I still keep a few Marble Queen cuttings going at all times because the leaf patterns make great gifts for your friends and family members.
Troubleshooting Failed Cuttings
Your pothos cutting not rooting can feel like a punch to the gut. But most pothos propagation mistakes come from 5 common problems you can fix in minutes. I've lost about a dozen cuttings over the years and each time it came down to one of these issues listed below.
The reasons why pothos cuttings fail are backed by real science from university research. UF/IFAS confirms that plant health drops fast above 95°F or below 65°F at night. Root rot pothos cuttings deal with often starts from bacterial growth water pothos sits in too long. The fixes below cover each problem with clear steps you can take right now to save your cuttings.
No Node on the Cutting
- Symptom: The cutting sits in water for weeks without producing any root growth, and turns yellow and soft at the submerged end over time.
- Cause: Roots only develop from nodal tissue, which contains the special cells needed to generate new root growth points on the stem.
- Fix: Check your cutting for a small brown bump or raised ring where a leaf once attached to the stem, and recut from the parent plant if no node is present.
Bacterial Growth in Water
- Symptom: Water turns cloudy, develops a bad smell, and the submerged stem becomes slimy or turns brown within the first 2 weeks.
- Cause: Stagnant water depletes oxygen and creates conditions for bad bacteria to multiply fast, attacking the soft tissue of the cutting.
- Fix: Change water every 3 to 5 days as the University of Illinois Extension suggests, use a clean container each time, and trim any darkened stem tissue before placing back in fresh water.
Temperature Too Cold
- Symptom: Cuttings show no root development after 4 to 6 weeks, and leaves may curl downward or develop dark spots along the edges.
- Cause: UF/IFAS Extension confirms plant health drops below 65°F (18°C) at night, and root growth slows down a lot below 70°F (21°C).
- Fix: Move cuttings to a warmer spot between 70 and 90°F (21 to 32°C) away from cold drafts, AC vents, and single pane windows.
Leaves Submerged in Water
- Symptom: Submerged leaves turn yellow, become mushy, and break down into the water, creating a breeding ground for bacteria that attacks the stem.
- Cause: Leaves are not built for underwater life and start to rot when submerged, releasing organic matter that feeds harmful germs in the water.
- Fix: Strip all leaves from the bottom part of the cutting before placing it in water, making sure only the bare stem and node sit below the waterline.
Too Much Direct Sunlight
- Symptom: Water heats up a lot during the day, leaves develop brown crispy patches, and the cutting wilts even though it has enough water.
- Cause: Direct sun raises water temperature above the safe range and causes leaf scorch, forcing the cutting to spend its limited energy on damage repair instead of root growth.
- Fix: Move the cutting to a spot with bright indirect light, which UF/IFAS describes as 63 to 80% shade, such as a few feet back from a sunny window.
Check your cuttings against this list if roots haven't shown up after 4 weeks. Most of the time you can fix the problem and save the cutting before it's too late.
Best Season for Propagation
Knowing when to propagate pothos saves you weeks of waiting for roots. The best time propagate pothos is during pothos propagation spring from March through April. That's what the University of Illinois Extension says works best. Penn State confirms that cuttings root better during the pothos growing season from spring through summer.
The reason spring works so well comes down to biology. Your plant makes more growth hormones during the active season. Longer days give cuttings more light energy for building roots. I've tracked my results over 4 full years and spring cuttings root about twice as fast as winter ones in my home.
That said, year-round propagation is still possible with the right setup. You just need to give your cuttings extra warmth and light during the colder months. The table below shows what to expect and what to adjust in each season so you can plan your cuts for the best results.
Don't let winter stop you from making new plants. A simple heat mat and grow light will keep your cuttings rooting strong even in the coldest months of the year.
Caring for New Pothos Plants
Caring for your new plants the right way in the first month makes all the difference. Care propagated pothos needs focus on 3 things: water, light, and temperature. Transplanting pothos cuttings into their new home is just the start. The first 4 weeks after transplant decide if your new plant will thrive or struggle going forward.
During weeks 1 and 2, keep the soil damp at all times so the roots can settle into their new home. Watering new pothos cuttings at this stage means checking the soil every 2 days to make sure it hasn't dried out. Place your pot near a window with bright indirect sunlight but not in the direct path of the sun's rays. UF/IFAS says you need at least 150 foot candles of light for the best color on your leaves.
Weeks 3 and 4 are when you start easing off the water. Your pothos humidity needs stay the same, but you can let the top inch of soil dry between each watering now. The roots should be strong enough to handle a more normal schedule at this point. Penn State recommends keeping the air between 60 and 80°F for the best growth rate.
By month 2 your new plant should show fresh leaves and strong growth. Give it indirect light pothos loves for at least 6 to 8 hours each day. Use a soil mix with a pH between 6.5 and 7.0 as UF/IFAS suggests for the best nutrition intake. Feed with a balanced liquid plant food once a month during the growing season to boost new vine growth.
One important safety note before you set up your new plants. Pothos is toxic at a medium severity level based on NC State Extension data. It can harm humans, cats, dogs, and horses. The sap contains calcium oxalate crystals that cause mouth pain and swelling if eaten. Wear gloves when you handle cuttings and keep your new plants out of reach of kids and pets at all times.
5 Common Myths
You need rooting hormone powder or gel to successfully propagate pothos cuttings in water or soil.
Pothos produces sufficient natural auxins to root on its own, and University of Illinois Extension notes that excessive rooting hormone actually inhibits root formation.
Pothos can be grown from seeds just like most other common houseplants you buy at garden centers.
Pothos has not been observed flowering in cultivation because it lacks gibberellin biosynthetic genes, meaning virtually all cultivated pothos come from vegetative cuttings.
You should place pothos cuttings in direct sunlight on a windowsill to help them root faster.
Direct sunlight heats water and scorches cuttings. University sources recommend bright indirect light with 63 to 80 percent shade for optimal rooting conditions.
Pothos cuttings will root from any part of the stem as long as you keep the cutting in fresh water.
A node must be present on the cutting because roots only develop from nodal tissue. Without a node, the cutting will eventually wilt and die regardless of water quality.
Water-propagated pothos roots are just as strong as soil-propagated roots when you transplant them.
Water-grown roots are structurally different from soil-grown roots and need an adjustment period after transplanting, which is why gradual transition to soil reduces transplant shock.
Conclusion
Now you know how to propagate pothos in 3 clear steps that work for any skill level. Cut below a node, root in water or soil, then transplant once roots hit 1 to 2 inches long. UW Madison data shows roots form in 3 to 4 weeks. Spring is the best time to start based on research from U of Illinois.
The best part about pothos propagation is that your plant makes its own rooting hormones. You don't need to buy any products to grow new pothos plants at home. Just grab a glass jar and a clean pair of scissors. One vine can turn into an entire collection of plants for every room in your house over time.
Here's a bonus tip no one talks about. The water your pothos cuttings root in contains natural growth hormones. You can use that water to help other houseplant propagation projects root faster too. Pour it on your other cuttings and watch them speed up their root growth in the same jar.
Just keep safety in mind when you propagate pothos around kids or pets. The plant contains calcium oxalate that can cause mouth pain if eaten. Wear gloves and wash your hands after each cutting session. Now grab your scissors and start growing your new pothos plants today.
External Sources
Frequently Asked Questions
Where is the best place to cut a pothos vine for propagation?
Cut about half an inch below a leaf node, which is the small brown bump where a leaf meets the stem. Each cutting should be 3 to 5 inches long with at least two healthy leaves.
Which is better for propagating pothos: water or soil?
Water propagation is easier for beginners because you can monitor root growth, while soil propagation produces stronger roots that adapt faster after transplanting.
How long before pothos cuttings root in water?
Pothos cuttings typically develop visible roots within 3 to 4 weeks in water at warm temperatures between 70 and 90 degrees Fahrenheit (21 to 32 degrees Celsius).
Do pothos cuttings require sunlight to root?
Pothos cuttings need bright indirect light to root but should never sit in direct sunlight, which can heat the water and scorch leaves.
What causes my pothos cuttings to rot in water?
Cuttings rot when water is not changed regularly, allowing bacteria to multiply. Other causes include submerged leaves, no node on the cutting, and cold temperatures.
Is it okay to use honey instead of rooting hormone?
Honey has antibacterial properties that protect cuttings, but pothos already produces enough natural auxins to root on its own without any rooting aid.
What is the best way to make my pothos bushier?
Propagate stem cuttings and plant them back into the same pot as the mother plant, or prune leggy vines to encourage branching at the cut points.
Can coffee grounds be good for pothos plants?
Used coffee grounds can add nitrogen and slightly lower soil pH, but too much causes fungal problems. Composted grounds mixed sparingly into soil work better than fresh grounds.
What is the best time to repot propagated pothos?
Transplant water-rooted pothos cuttings to soil once roots reach 1 to 2 inches (2.5 to 5 centimeters) in length, typically after 3 to 4 weeks.
Could pothos survive in low-light bathrooms?
Pothos tolerates low light better than most houseplants and thrives in bathrooms where higher humidity supports healthier growth.