
Introduction
Welcome to How to Grow Rutabagas: Expert Guide for Home Gardeners. This cool-season vegetable is a natural cross between cabbage and turnip. Families in Sweden and Norway grew it as a staple food for hundreds of years. The Irish even carved these roots into lanterns long before pumpkins took that job. Today more backyard growers add this crop to their root vegetable garden every single year because it is simple to grow and stores well for months.
I started growing these roots about 8 years ago when a friend shared a bag from her fall harvest. That first bite of roasted, frost sweetened root changed my whole garden plan. A single 10 foot row gives you 8 to 10 pounds of food. You only need about 5 to 10 feet of row per person for a full season supply. Those numbers make this one of the best returns on garden space I have ever tracked in my own backyard beds.
Most gardeners skip this fall harvest vegetable because they think it takes too much effort. The truth is the opposite. These roots need 80 to 110 days to mature but ask for very little care along the way. Each harvest packs a real nutrition punch too. Just 100 grams of the raw root gives you 42% of your daily vitamin C plus solid potassium and fiber numbers from a single serving. Few other crops in the garden can match that kind of value for the effort you put in during the growing season.
Think of this crop as the patient gardener's reward. Quick greens give you salads for a week or two at best. One planting fills your root cellar for months of winter eating from just a single row in the ground. Below you will find all the steps to grow this crop from seed to storage in your own backyard.
Best Rutabaga Varieties
Picking the right rutabaga varieties makes all the difference when you plan your harvest. Most rutabaga cultivars take 85 to 100 days to reach full size. Those days to maturity rutabaga growers track change your whole planting plan. You need to count back from your first frost date to know when to get seeds in the ground.
I have grown 4 of these in my own beds over many seasons. American Purple Top rutabaga is my top pick if you are just starting. It is the best rutabaga for beginners by far. You get 5 solid picks below that cover different tastes, sizes, and growing season lengths to match your garden goals.
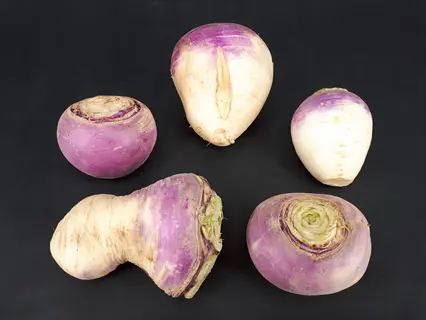
American Purple Top
- Maturity: Reaches harvest size in approximately 90 days from direct sowing, making it one of the most reliable options for gardeners across USDA zones 3 through 9.
- Appearance: Produces globe-shaped roots with a distinctive purple crown above the soil line and creamy yellow flesh below that deepens in color as the root matures.
- Flavor: Delivers a mildly sweet and slightly peppery taste that becomes noticeably sweeter after exposure to light frost in autumn temperatures.
- Growing Conditions: Performs best in well-drained soil with a pH between 6.0 and 7.0 and consistent moisture of 1 to 1.5 inches (2.5 to 3.8 centimeters) per week.
- Best For: Ideal for first-time rutabaga growers because of its wide availability, forgiving nature, and consistent root shape and size at harvest.
- Storage: Stores exceptionally well for 4 to 5 months at 32 to 40 degrees Fahrenheit (0 to 4 degrees Celsius) with 90% to 95% humidity.

Laurentian
- Maturity: Matures in about 90 days and has been a popular home garden choice in northern climates for decades because of its dependable cold tolerance.
- Appearance: Develops a slightly flattened globe shape with a purple top and light yellow flesh that holds its color well through cooking and storage.
- Flavor: Known for a smooth, buttery flavor with less of the sharp brassica bite than some other varieties, making it a good choice for mashing and soups.
- Growing Conditions: Thrives in cooler northern regions and performs reliably in zones 3 through 7 with average soil preparation and regular watering schedules.
- Best For: Well-suited for gardeners who want a versatile cooking rutabaga that works equally well roasted, mashed, or added to stews and casseroles.
- Storage: Canadian-bred variety with excellent keeping quality, storing 3 to 5 months under proper root cellar conditions without significant loss of texture.
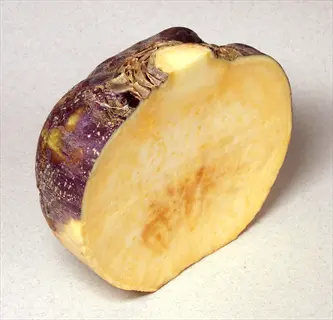
Altasweet
- Maturity: Takes approximately 92 days from sowing to harvest, just slightly longer than American Purple Top but with a noticeably sweeter flavor profile.
- Appearance: Grows large, uniform globe-shaped roots with smooth skin and bright yellow flesh that maintains a vibrant color even after extended storage periods.
- Flavor: Bred specifically for reduced bitterness and enhanced sweetness, making it the top choice for gardeners who find traditional rutabaga flavor too strong.
- Growing Conditions: Needs full sun and consistent watering to develop its signature sweetness. Inconsistent moisture leads to bitter flavor even in this mild variety.
- Best For: Perfect for introducing rutabagas to picky eaters or children because of its mild, almost turnip-free sweetness that appeals to broader palates.
- Storage: Stores well for 3 to 4 months at standard root cellar temperatures and humidity levels with minimal flavor degradation over time.
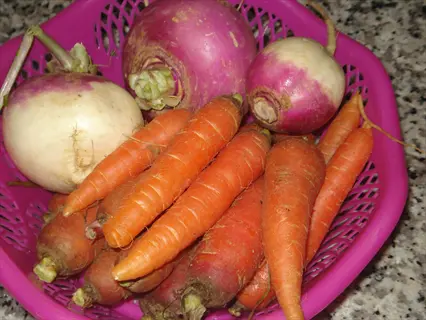
Swede Purple Top
- Maturity: Requires approximately 100 days to reach full size, making it one of the longer-season options that needs earlier planting in cooler climates.
- Appearance: Produces large, robust roots weighing up to 3 to 5 pounds (1.4 to 2.3 kilograms) each with a rich purple crown and dense golden interior.
- Flavor: Offers a full-bodied, earthy flavor with a slight sweetness that intensifies significantly after several hard frosts, rewarding patient gardeners.
- Growing Conditions: Prefers loose, deeply worked soil at least 12 inches (30 centimeters) deep because its larger root size demands more underground growing room.
- Best For: Recommended for experienced gardeners seeking maximum yield per plant and those who enjoy a more robust, traditional European rutabaga flavor.
- Storage: The larger root size and dense flesh contribute to outstanding long-term storage of 4 to 6 months under optimal cold and humid conditions.

Joan
- Maturity: Matures in approximately 85 days, making it one of the fastest rutabaga varieties and a strong choice for gardeners in short-season northern climates.
- Appearance: Grows compact, uniformly round roots with smooth purple and cream skin that is easy to peel and a bright yellow interior when sliced open.
- Flavor: Mild and slightly nutty flavor that works well both raw in salads and slaws and cooked in traditional roasted or mashed preparations.
- Growing Conditions: Adaptable to a wider range of soil conditions than most varieties, though it still performs best in well-drained loam with consistent moisture.
- Best For: Great for gardeners in zones 3 and 4 with shorter growing seasons who need a quick-maturing variety that still delivers full-sized roots.
- Storage: Stores for 2 to 4 months in cool conditions, slightly shorter than American Purple Top but still provides reliable winter eating from a single harvest.
Planting Rutabagas Step by Step
Planting rutabagas is simple once you know the right rutabaga planting time for your zone. You always want to direct sow rutabaga seeds right into the garden bed. These roots don't handle being moved after they start growing. The key question is when to plant rutabagas, and that answer depends on where you live.
I get the best results when I count back 90 to 100 days from my first expected frost date. That math gives you the ideal window every time. Your rutabaga seed depth and rutabaga spacing matter a lot too. Follow the steps below to get each detail right from the start.
Prepare the Soil Bed
- Soil depth: Loosen soil to at least 12 inches (30 centimeters) deep because rutabaga taproots need uncompacted ground to develop their full globe shape without forking.
- Amendments: Work in no more than 1 inch (2.5 centimeters) of well-composted organic matter per 100 square feet (9.3 square meters) to improve drainage and texture.
- pH testing: Test soil pH and aim for a range of 6.0 to 7.0 using lime to raise or sulfur to lower the reading according to university extension recommendations.
- Pre-fertilize: Apply 2 to 5 pounds (0.9 to 2.3 kilograms) of 10-10-10 fertilizer per 100 square feet (9.3 square meters), mixing half into the soil before planting.
Sow Seeds at the Right Time
- Timing rule: Count backward 80 to 110 days from your expected first hard frost date to find your ideal sowing window for a sweet fall harvest.
- Northern zones (3-4): Plant from late May through early June to give roots enough cool-weather growing time before the ground freezes hard.
- Central zones (5-6): Sow from mid-June through mid-July, which matches the Iowa State Extension recommendation for best results in moderate climates.
- Southern zones (7-9): Plant from late July through August so roots mature during the cooler months of fall rather than in lingering summer heat.
Space and Sow Properly
- Seed depth: Push seeds a quarter to half inch (0.6 to 1.3 centimeters) deep into moist soil and press gently to ensure good seed-to-soil contact for germination.
- Row spacing: Leave 14 to 24 inches (36 to 61 centimeters) between rows depending on your garden layout, with wider spacing making weeding and watering easier.
- Germination time: Expect seedlings to emerge in 6 to 10 days, with faster sprouting in soil temperatures between 60 and 85 degrees Fahrenheit (16 to 29 degrees Celsius).
- Seed viability: Rutabaga seeds remain viable for up to 3 years when stored in a cool, dry place, so leftover seed from this season can be used in future plantings.
Thin Seedlings for Root Growth
- When to thin: Wait until seedlings reach 2 to 3 inches (5 to 8 centimeters) tall before removing extra plants to give the strongest ones room to develop large roots.
- Final spacing: Thin to 6 to 8 inches (15 to 20 centimeters) between plants, following the University of Minnesota Extension recommendation of 8 inches for optimal root size.
- Technique: Snip unwanted seedlings at the soil line with scissors rather than pulling them out, which avoids disturbing the roots of neighboring plants you want to keep.
- Use thinnings: Young rutabaga thinnings are edible greens with a mild brassica flavor that can be tossed into salads or sauteed as a garden bonus harvest.
Watering, Feeding, and Care
Good rutabaga care starts with the consistent moisture rutabagas need all season long. Watering rutabagas on a steady schedule is the single most important thing you can do for root quality. I learned this the hard way when my first crop came out bitter and tough after a dry stretch in late summer.
Bitter rutabaga causes include drought stress, heat waves, and gaps in your watering pattern. When roots don't get enough water during bulb formation, they turn woody and sharp in flavor. Root splitting prevention starts with keeping the soil moist at all times. Give your plants 1 to 1.5 inches of water per week and don't let the bed dry out between sessions.
Your rutabaga fertilizer plan should be simple and targeted. Apply half your fertilizer at planting time and save the rest for a side dressing 4 to 6 weeks after seeds go in. Too much food pushes green tops at the cost of root size. The care schedule below shows you what to do and when to do it through the full growing season.
Rutabaga Pest and Disease Control
Rutabaga pests and rutabaga diseases can wreck your whole crop if you don't catch them fast. I lost half a bed to flea beetles rutabaga damage in my second year because I waited too long to act. Floating row covers are your best first line of defense against most insects. Good organic pest control rutabaga growers use starts with knowing what to look for early in the season.
Clubroot rutabaga plants suffer from is the most serious disease you can face. Clubroot prevention matters because the spores live in soil for 15 to 20 years once they move in. Rotate your crops on a 3 to 4 year cycle and never plant brassicas in the same bed back to back. The list below covers the biggest threats and tells you how to handle each one.
Flea Beetles
- Symptoms: Tiny round holes appearing across leaves, especially on young seedlings, creating a shotgun-hole pattern that weakens plants and slows early growth significantly.
- Prevention: Install floating row covers immediately after sowing seeds to create a physical barrier that keeps adult flea beetles from reaching tender seedling leaves.
- Control: Apply diatomaceous earth around the base of plants after rainfall or sprinkle kaolin clay on leaves to create a mineral coating that deters feeding adults.
Aphids and Cabbage Loopers
- Symptoms: Aphids cluster on leaf undersides causing curling and sticky honeydew, while cabbage loopers chew irregular holes through leaves and leave dark green droppings.
- Prevention: Plant nasturtiums nearby as trap crops to lure aphids away from rutabaga leaves, and encourage ladybugs and lacewings that naturally feed on aphid colonies.
- Control: Blast aphids off with a strong water spray from a hose, or apply Bacillus thuringiensis (Bt) spray to control cabbage loopers without harming beneficial insects.
Root Maggots and Wireworms
- Symptoms: Plants wilt despite adequate watering, and pulled roots reveal tunnels, brown scars, or small white maggots feeding inside the rutabaga flesh below ground.
- Prevention: Place paper or cardboard collars around the base of each stem at soil level to block adult flies from laying eggs near the root zone.
- Control: Rotate crops on a strict 3 to 4 year schedule and avoid planting in beds where any brassica, radish, or turnip grew within the past three seasons.
Clubroot Disease
- Symptoms: Leaves wilt on warm days and recover at night, roots swell into distorted club-like masses when pulled, and plants fail to produce usable bulbs.
- Prevention: Test soil pH and raise it above 7.0 with agricultural lime because the Plasmodiophora brassicae pathogen thrives in acidic conditions below pH 6.5.
- Control: Dormant clubroot spores survive 15 to 20 years in infected soil, so choose resistant varieties and practice long rotation cycles of at least 7 years in affected beds.
Leaf Spot and White Rust
- Symptoms: Leaf spot appears as small brown or gray circular lesions, while white rust creates raised white pustules on leaf undersides that rupture and release powdery spores.
- Prevention: Provide good air circulation between plants through proper spacing, avoid overhead watering that keeps foliage wet, and remove debris from the garden bed.
- Control: Remove and destroy affected leaves immediately. Apply copper-based fungicide as a preventive measure during humid weather when these diseases spread most actively.
Harvesting and Storing Rutabagas
Knowing when to harvest rutabagas makes the difference between a good crop and a great one. Frost sweetens rutabagas, so leave your roots in the ground past the first few light frosts. I wait until October most years and the flavor reward is worth every extra day. Look for roots that are 3 to 5 inches across with the top pushing above the soil line. They should feel firm when you squeeze them.
Harvesting rutabagas is easy with a garden fork or spade. I just loosen the soil around each root and pull with a gentle twist. Your 10 foot row should give you 8 to 10 pounds of roots if you kept your water and food steady. Leave them in the ground until October or later for the best taste. Frost makes the flavor much sweeter. In my experience, storing rutabagas the right way lets you eat from that harvest for months.
You have several storage options depending on your setup at home. Root cellar storage rutabaga growers prefer gives you the longest shelf life at up to 5 months. Waxing rutabagas for storage works great for smaller amounts in your fridge. Texas A&M notes that waxed roots last 1 to 2 months under standard refrigeration. You can also try in-ground winter storage under heavy mulch until the ground freezes solid. The table below compares each method so you can pick what fits your space.
Rutabaga Nutrition and Uses
The rutabaga nutrition profile makes this one of the best crops you can grow for your health. It is a low calorie root vegetable with just 37 calories per 100 grams of raw root. Rutabaga vitamin C levels hit 42% of your daily needs in a single serving. A potato gives you 77 calories for the same weight with far less vitamin C. I swap potatoes for rutabagas at dinner and my family loves the taste just as much.
The rutabaga health benefits go past basic vitamins too. You also get glucosinolates rutabaga fans love for their health perks. Lab tests showed that root extracts slowed tumor cell growth. Those results came from research in food chemistry journals. One cup of cooked mashed root gives you 50% of your daily vitamin C. That same cup packs 15% of your daily fiber too.
Cooking rutabagas is simple and works with many meals you make at home. When I first tested roasting frost sweetened roots with olive oil and salt, the taste won me over. You can mash them, add them to soups, or toss raw slices into a winter slaw. The greens from your plants are edible too and pack vitamins A, B2, C, and E as a bonus harvest from every plant you grow.
5 Common Myths
Rutabagas and turnips are the same vegetable, just with different names used in different regions.
Rutabagas are a natural cross between cabbage and turnip, with yellow flesh, denser roots, and 30 to 45 more days to maturity than turnips.
You must start rutabaga seeds indoors and transplant seedlings to the garden for the best results.
Rutabagas should be direct-sown because they are taprooted vegetables that do not transplant well and seedlings suffer root damage during the move.
Rutabagas need hot summer weather and long sunny days to develop their largest and sweetest roots.
Root development is best below 75 degrees Fahrenheit (24 degrees Celsius), and heat causes bitter, woody roots, which is why fall harvest timing is essential.
Adding extra fertilizer throughout the growing season will produce bigger and better rutabaga roots.
Over-fertilizing rutabagas causes excessive leafy top growth at the expense of root development, so one or two targeted applications is enough.
Once clubroot infects your garden soil, you can never grow rutabagas or other brassicas in that spot again.
While clubroot spores survive 15 to 20 years, raising soil pH above 7.0, using resistant varieties, and long crop rotations can manage the disease over time.
Conclusion
Now you know how to grow rutabagas from seed to storage in your own backyard. Growing rutabagas takes 80 to 110 days of patience, but the payoff makes the wait worth it. A single 10 foot row gives you 8 to 10 pounds of roots, and proper storage keeps your harvest fresh for up to 5 months through the winter.
This fall harvest vegetable gives you more than most crops can at the end of the season. Each serving packs 42% of your daily vitamin C along with strong potassium and fiber numbers. I still find it hard to believe that a root this easy to grow delivers so much nutrition for so little effort in the garden.
Rutabagas are cold-hardy root vegetables that keep going after your tomatoes and peppers are done. When you plant at the right time for your zone, you get frost sweetened roots ready for roasting, mashing, and soups during the coldest months of the year. No other crop in my garden gives me that kind of return on my time.
Plan your planting window now and get your seeds ordered before the season starts. Your first harvest will show you why more gardeners add this crop to their beds every year. Once you taste a root you grew yourself, you won't want to go back to store bought.
External Sources
Frequently Asked Questions
Which soil requirements are essential for growing rutabagas?
Rutabagas thrive in well-drained, loose soil with a pH between 6.0 and 7.0 and plenty of organic matter worked into the top 12 inches.
Could rutabagas handle frost during their growth cycle?
Yes, rutabagas tolerate light frost well, and exposure to cold temperatures actually converts starches to sugars, improving flavor.
Which companion plants benefit rutabaga growth?
Peas, onions, garlic, and nasturtiums all benefit rutabaga growth through nitrogen fixation, pest deterrence, or trap cropping.
What effect does sunlight exposure have on rutabaga development?
Rutabagas need at least six hours of direct sunlight daily for healthy leaf growth and proper root bulb formation.
Which indicates rutabagas are ready for harvest?
Rutabagas are ready when roots reach 3 to 5 inches in diameter, the top of the bulb pushes above the soil line, and they feel firm when squeezed.
Can synthetic fertilizer be safe for rutabagas?
Yes, synthetic fertilizer is safe when applied at recommended rates, such as 2 to 5 pounds of 10-10-10 per 100 square feet.
Is it okay to grow rutabagas in containers successfully?
Container growing is possible but challenging because rutabagas develop large taproots that need at least 12 inches of soil depth.
Which pests commonly attack rutabaga plants?
Flea beetles, aphids, cabbage loopers, root maggots, and wireworms are the most common pests that attack rutabaga plants.
What is the right way to rotate rutabagas in crop cycles?
Rotate rutabagas on a three to four year cycle, avoiding planting where any brassica family crops grew in previous seasons.
Can rutabaga greens be edible and nutritious?
Yes, rutabaga greens are edible and packed with vitamins A, B2, C, and E, making them a valuable bonus harvest from each plant.