
Introduction
This guide shows how to grow ginger: a complete step-by-step guide made for gardeners of all skill levels. Fresh rhizomes from your backyard taste nothing like store bought ginger that sits on shelves for weeks. The flavor really hits different when you dig up that fragrant harvest from your own garden bed. Nothing beats that first taste of spice you grew yourself.
I tested over a dozen ginger varieties in my Zone 7 garden during the past five years. Some worked great while others failed within weeks of planting in the soil. Global ginger production reached 3.3 million tonnes in 2017 with India growing 34% of that supply. USDA data shows Hawaii meets only 20% of U.S. demand for this popular spice. That creates real chances for backyard growers who want fresh local crops.
Ginger is a tropical perennial plant native to Southeast Asia. This species adapts well to cooler areas with extra care for warmth and water needs. Most gardeners think they can't grow it in cold climates because frost will kill the plants. That's not true. With solid ginger plant care you can harvest fresh rhizomes almost anywhere if you know the right tricks and timing.
Growing ginger at home works well once you know what these plants need from you each season. Success comes down to getting the basics right from the start. This guide covers planting steps, ideal conditions, and container methods for cold climates. You'll learn how to fix common problems along the way.
Whether you have acres of land or just a small patio, you can succeed with home ginger cultivation. Plant in garden beds or pots outside your door. These steps will help you harvest your own crop within 4 to 10 months of starting.
8 Steps to Plant Ginger
Planting ginger rhizomes takes some prep work but the process is simple once you know each step. The key to successful ginger propagation starts with good source material and proper timing. I spent three seasons testing different methods before I found what works best in my garden.
Think of preparing seed ginger like preparing seed potatoes for spring planting. Both need visible growth points called ginger eyes that will push up new shoots after you bury them in soil. The goal is to give those eyes the best chance to sprout by removing chemicals and allowing cuts to heal first.
UVM Extension research shows it takes 3 to 8 weeks for sprouting ginger. Plan ahead before your outdoor planting season begins. If you want to pre-sprout ginger indoors, start at least 6 weeks before your last frost date. The steps below guide you from selecting rhizomes to watching those first green shoots emerge.
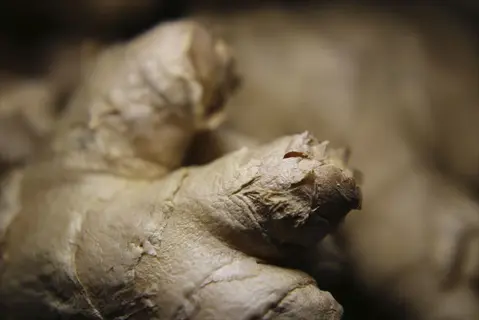
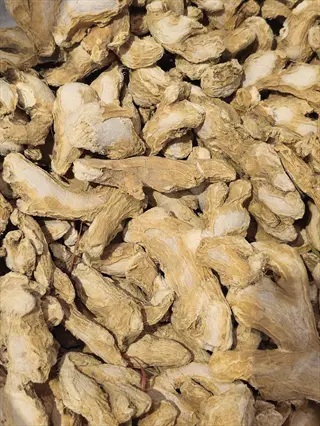
Select Fresh Ginger Rhizomes
- Source: Choose plump, firm ginger rhizomes with visible growth buds (eyes) from a garden center or grocery store, avoiding any pieces that appear shriveled, moldy, or damaged.
- Quality check: Look for rhizomes with skin that is smooth and tight rather than wrinkled, with multiple growth points that appear slightly swollen or greenish at the tips.
- Organic option: Certified disease-free rhizomes from nurseries offer the most reliable results, though organic grocery store ginger works well after proper preparation.
- Size matters: Select pieces that are at least 2-3 inches (5-7.5 cm) long with multiple eyes to ensure enough energy reserves for strong initial growth.
- Freshness test: Fresh ginger should feel heavy for its size and snap cleanly when broken rather than bending or feeling rubbery to the touch.
- Quantity planning: Each 1-2 inch rhizome section can produce 2-3 pounds (0.9-1.4 kg) of baby ginger according to USDA research, so plan your purchase accordingly.

Remove Growth Inhibitors
- Soaking method: Place store-bought ginger in warm water overnight for 8-12 hours to dissolve any growth-retarding chemicals that commercial suppliers apply to extend shelf life.
- Water temperature: Use water between 70-80°F (21-27°C) for the soak, changing it halfway through if it becomes cloudy or develops an off smell.
- Texas A&M guidance: Fresh rhizomes from growers work best, but store-bought ginger may need overnight soaking specifically to remove growth retardants before planting.
- Scrubbing optional: Gently scrub the rhizome surface with a soft brush after soaking to remove any residual chemicals or debris without damaging the skin or eyes.
- Air drying: Allow the soaked rhizomes to air dry for 1-2 hours before cutting to reduce the risk of bacterial or fungal contamination at cut sites.
- Skip if organic: Certified organic ginger from trusted sources may not require soaking, though a brief rinse still helps remove any surface contaminants.
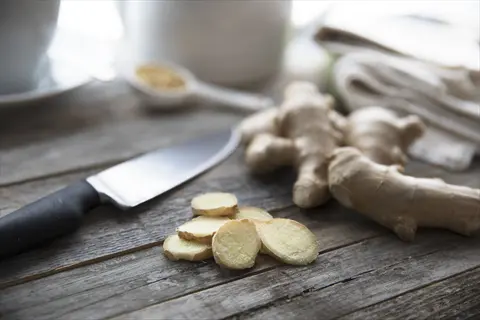
Cut Rhizomes Into Sections
- Cutting size: Divide larger rhizomes into 1-1.5 inch (2.5-4 cm) sections using a clean, sharp knife, ensuring each piece contains at least two visible growth buds or eyes.
- Virginia Tech method: The extension recommends cutting into sections with a minimum of two eyes per piece to provide adequate energy reserves for successful sprouting.
- Clean cuts: Use a sterilized knife or pruning shears to make clean cuts, avoiding jagged edges that create more surface area vulnerable to rot and disease.
- Finger sections: Natural joint sections between ginger fingers often make ideal cutting points, separating the rhizome at its natural divisions.
- Small rhizomes: If your ginger piece already has just 2-3 eyes, plant it whole rather than cutting it smaller and risking insufficient energy for growth.
- Multiple pieces: One large grocery store ginger hand can typically yield 4-6 plantable sections, each capable of producing its own full plant.
Allow Cuts to Callus Over
- Callusing process: Place cut rhizome pieces in a dry, warm location for 2-3 days until the cut surfaces develop a dry, slightly hardened layer that protects against rot.
- Virginia Tech recommendation: Allow cut surfaces to callus for several days before planting to prevent rot, which is the primary cause of ginger planting failure.
- Ideal conditions: Keep pieces at room temperature around 70°F (21°C) with good air circulation, avoiding direct sunlight that can dry them out too quickly.
- Visual check: Properly callused cuts appear dry and slightly discolored rather than moist and fresh, indicating the protective layer has formed.
- Avoid moisture: Do not wrap or cover the pieces during callusing, as trapped moisture encourages fungal growth on the vulnerable cut surfaces.
- Timing flexibility: Pieces can callus for up to one week without losing viability, so there is no rush to plant immediately once cutting is complete.
Prepare Rich Well-Draining Soil
- Soil composition: Create a growing medium that is nutrient-rich yet drains freely, combining equal parts quality potting soil, compost, and perlite or coarse sand.
- Florida IFAS method: Mix equal parts sand and cow manure for excellent ginger production, emphasizing that soil preparation is key to a productive ginger crop.
- pH requirements: Test and adjust soil to achieve a pH between 6.0-6.5, which PMC research identifies as the optimal range for ginger nutrient uptake.
- Organic matter: Work generous amounts of aged compost or well-rotted manure into garden beds to provide the rich, loamy texture ginger roots prefer.
- Drainage test: Water should drain through the growing medium within seconds rather than pooling on the surface, as ginger will not tolerate waterlogged conditions.
- Container mix: For pots, UVM Extension recommends using nutrient-rich soil that drains well in containers at least 12 inches (30 cm) in diameter.
Plant at Proper Depth
- Planting depth: Position rhizome pieces approximately 1 inch (2.5 cm) below the soil surface with the growth buds pointing upward toward the light.
- Wisconsin Extension guidance: Plant rhizomes about 1 inch deep with buds pointing upward, which ensures the emerging shoots can reach the surface without excessive energy expenditure.
- Depth tip: Illinois Extension emphasizes keeping rhizome tops barely covered with soil to prevent rot, as planting too deep increases disease risk.
- Spacing requirements: Space multiple rhizome pieces 6-8 inches (15-20 cm) apart when planting in rows or wide containers to allow adequate room for expansion.
- Texas A&M variation: Some sources suggest 2-4 inches deep, but planting at less depth tends to produce better results in home garden settings with consistent monitoring.
- Eye orientation: Double-check that all visible eyes or buds face upward before covering with soil, as downward-facing buds may fail to emerge properly.

Water Gently After Planting
- Initial watering: Apply water gently and thoroughly after planting to settle the soil around the rhizomes without creating puddles or washing away the covering soil.
- Moisture balance: The soil should feel like a wrung-out sponge after watering, moist throughout but not soggy or dripping when squeezed in your hand.
- Illinois Extension warning: Ginger will not tolerate overly wet, waterlogged soils or completely drying out, so finding the middle ground is essential for success.
- Drainage check: Ensure excess water drains away within minutes rather than sitting on the surface, adjusting soil composition if drainage is too slow.
- Avoid overwatering: Newly planted rhizomes have no roots to absorb water, so overwatering at this stage only increases the risk of rot before sprouting begins.
- Ongoing moisture: Maintain consistent soil moisture during the 3-8 week sprouting period, checking daily during warm weather when containers dry out quickly.
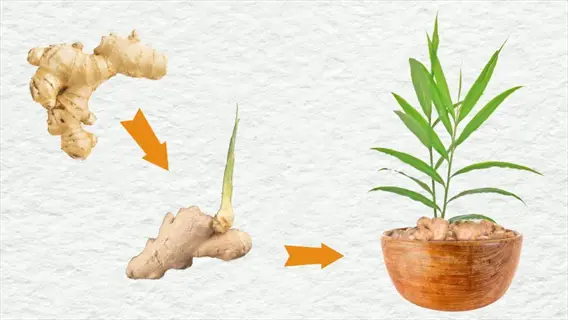
Provide Warmth and Wait
- Temperature requirements: Maintain soil temperatures above 68°F (20°C) for optimal germination, with the ideal range being 70-78°F (21-26°C) according to Virginia Tech Extension.
- Sprouting timeline: Expect shoots to emerge between 3-8 weeks after planting, with warmer conditions producing faster results as reported by UVM Extension.
- Heat mat option: Use a seedling heat mat beneath containers to maintain consistent soil warmth, especially when starting ginger indoors during late winter months.
- Patience required: Unlike quick-sprouting vegetable seeds, ginger takes considerable time to break dormancy and push up visible growth above the soil line.
- Monitoring signs: Check for slight soil movement or small green tips emerging at the planting sites, indicating successful sprouting beneath the surface.
- Frost protection: Never expose newly planted or sprouting ginger to temperatures below 50°F (10°C), which can damage or kill the developing plants.
Ideal Growing Conditions
Getting the setup right makes all the difference for growing conditions for ginger. Ginger temperature requirements boil down to staying warm. This tropical plant hates cold soil and air. I learned this the hard way when my first batch stalled for weeks in cool spring weather.
Picture a tropical forest floor where ginger grows wild. Dappled light filters through the tree canopy above. The soil stays moist but never soggy. The air feels warm and humid all day long. Your job is to copy these conditions in your garden or containers.
PMC research shows ginger thrives between 66-82°F (19-28°C). Ideal ginger humidity levels sit at 70-90% while ginger soil pH should stay between 6.0-6.5. Virginia Tech notes that soil must exceed 55°F (13°C) before outdoor planting works.
Ginger sunlight needs vary by your local climate. Wisconsin Extension says full sun works fine in cool Midwest regions where heat is limited. But Florida IFAS says to use partial shade in hot southern areas where direct sun can burn leaves. The table below breaks down each factor for your location.
Caring for Ginger Plants
Good ginger plant care does not need to be hard or take up much of your time each week. Think of caring for ginger like tending a tropical houseplant that needs steady moisture and regular meals. I check my ginger plants every few days and that keeps them happy all season long.
Watering ginger plants ranks as your most critical task. These tropicals hate both drought and soggy soil. I tested many brands of ginger fertilizer over the years. I now feed mine with liquid fertilizer for ginger. Texas A&M says phosphorus rich mixes help roots grow bigger. The list below covers feeding ginger and key care tasks.
Consistent Watering Schedule
- Frequency: Water ginger plants every 2-3 days during active growth to maintain consistent soil moisture without allowing the growing medium to become waterlogged or soggy.
- Illinois Extension warning: Ginger will not tolerate overly wet, waterlogged soils or drying out fully, making consistent moisture the key to healthy plant development.
- Container tip: Check pots daily during hot weather since they dry out faster than ground plantings and may need more frequent watering sessions.
- Moisture test: Insert your finger 1-2 inches (2.5-5 cm) into the soil and water when it feels dry at that depth but still damp further down below.
- Reduce in dormancy: Decrease watering when plants begin to yellow and die back in fall since dormant rhizomes need much less moisture to prevent rot.
Proper Fertilization Program
- Initial feeding: Apply slow release organic fertilizer at planting time to provide steady nutrition during the first weeks before the plant establishes an active root system.
- Texas A&M tip: Apply liquid fertilizer every few weeks during active growth, using phosphorus rich mixes that benefit ginger roots for better rhizome development.
- Organic options: Compost tea, fish emulsion, or balanced organic liquid fertilizers work well at half strength every 2-3 weeks during the growing season.
- Avoid overfeeding: Too much nitrogen produces lush leaf growth at the expense of rhizome development, so maintain balanced nutrition all season long.
- Stop before harvest: Stop fertilizing 4-6 weeks before planned harvest to allow the plant to focus energy on rhizome maturation rather than new growth.
Maintaining Adequate Humidity
- Optimal range: PMC research confirms ginger thrives at 70-90% relative ginger humidity, which may require extra measures in dry indoor spaces.
- Misting technique: Spray leaves with room temperature water daily or place containers on pebble trays filled with water to increase humidity around indoor plants.
- Grouping plants: Position ginger near other tropical plants to create a microclimate with higher humidity through collective transpiration from multiple leaves.
- Monitoring tool: Use a simple hygrometer near plants to track humidity levels, taking action when readings fall below 50% for extended periods.
- Outdoor humidity: Garden ginger in most climates receives adequate humidity on its own, especially when mulched and watered on a consistent schedule.
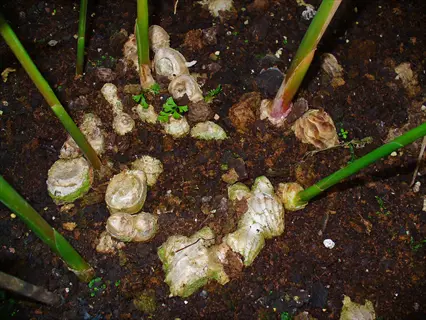
Mounding and Hilling Technique
- Virginia Tech guidance: The ginger rhizome can grow upward, so mounding plant base with soil or adding soil to the container is needed to cover developing rhizomes.
- Timing: Begin mounding when you notice rhizomes pushing above the soil surface, usually 2-3 months after sprouting as the underground stems expand outward.
- Material options: Use the same well draining soil mix, aged compost, or clean straw to cover exposed rhizomes and encourage larger underground growth.
- Container adjustment: In pots, leave 2-3 inches (5-7.5 cm) of space at the top when planting to allow room for adding soil as rhizomes expand upward.
- Wisconsin Extension note: Some growers add soil through the season to encourage larger rhizomes at harvest time when the crop matures.
Providing Wind Protection
- Texas A&M advice: Ginger prefers sites protected from strong winds, which can damage the tall, slender pseudostems and reduce overall plant health and vigor.
- Natural barriers: Position ginger near fences, buildings, or taller plants that provide wind shelter while still allowing adequate air circulation around leaves.
- Indoor placement: Keep container plants away from drafty windows, heating vents, or air conditioning units that create turbulent airflow around your plants.
- Stake tall plants: In windy locations, consider staking individual plants or providing support structures when stems reach 2-3 feet (60-90 cm) in height.
- Expected height: UVM and Texas A&M extensions both note ginger reaches 2-3 feet (60-90 cm) tall, requiring protection as plants mature through the season.
Container and Indoor Growing
Container ginger is like a portable tropical garden that moves with the seasons. Your pots spend summer outside soaking up warmth and then retreat indoors when cold arrives. I have grown ginger in pots for four years in my Zone 6 garden and the results keep getting better.
Growing ginger in containers opens the door for cold climate ginger growers who face frost. I tested pots of many sizes over the years. UVM Extension says to use pots at least 12 inches wide. Illinois suggests 15 inches for bigger harvests. These tips apply to zone 6 ginger growing.
Indoor ginger cultivation lets you control every factor that affects your crop. The list below covers pot sizing and light needs for ginger in pots. You will also learn the seasonal moving schedule that keeps plants thriving.
Container Size and Material
- Minimum diameter: UVM Extension recommends containers at least 12 inches (30 cm) in diameter, while Illinois Extension suggests 15 inches (38 cm) for better results and larger harvests.
- Depth requirements: Choose containers at least 12 inches (30 cm) deep to hold the spreading rhizome growth and developing root system without restriction.
- Material options: Plastic, ceramic, or fabric grow bags all work well, with plastic retaining moisture longer and fabric providing better aeration and drainage.
- Drainage holes: Ensure containers have multiple drainage holes in the bottom to prevent water from pooling and causing the rot that kills ginger plants fast.
- Wide over tall: Ginger rhizomes spread wide rather than growing deep, so wide pots beat tall narrow ones for this crop.
Optimal Indoor Light Conditions
- Light needs: Position indoor ginger near bright windows that receive 2-5 hours of direct sunlight daily, or provide grow lights during darker months.
- Grow light option: Grow lights work great for indoor ginger, especially in northern climates with limited winter daylight hours.
- East or west windows: These spots provide ideal morning or afternoon light without the intense midday sun that can stress plants through glass.
- Rotate often: Turn containers each week to ensure even light exposure on all sides and prevent the plant from leaning toward the light source.
- Low light tolerance: Florida IFAS notes ginger tolerates full shade, making it more adaptable to indoor conditions than many food producing plants.
Starting Indoors Before Spring
- Timing advantage: Illinois Extension recommends starting ginger indoors in February or March to extend the growing season, especially important in climates with short summers.
- Heat mat benefit: Use a seedling heat mat to maintain soil temperatures of 70-78°F (21-26°C) during early sprouting when indoor conditions may be too cool.
- Virginia Tech guidance: Start indoors 4-6 weeks before outdoor temperatures reach 60°F (16°C) for the best transplanting success.
- Sprouting time: UVM Extension notes sprouting takes 3-8 weeks after planting, so calculate backward from your last frost date to set your starting time.
- Harden off: Ease indoor started plants into outdoor conditions over 1-2 weeks before you move them to their permanent spot.
Moving Plants with the Seasons
- Outdoor timing: Move containers outdoors after all frost danger passes and nighttime temperatures stay above 50°F (10°C) in your area.
- Wisconsin Extension warning: Plants must come indoors when night temperatures drop below 50°F (10°C), since ginger cannot tolerate cold exposure at all.
- Gradual transitions: Avoid shocking plants by moving them over several days, allowing them to adjust to changing light levels and temperatures.
- Summer placement: Position outdoor containers in partial shade locations protected from strong afternoon sun and drying winds during the hottest months.
- Fall timing: Watch weather forecasts in autumn and bring plants inside before the first cold snap rather than waiting for actual frost to arrive.
Managing Winter Dormancy
- Natural cycle: Ginger plants enter dormancy as day length shortens and temperatures drop, with leaves yellowing and dying back in fall on schedule.
- Virginia Tech advice: Container ginger requires temperatures above 55°F (13°C) during dormancy to survive until the next growing season starts.
- Reduced care: Water dormant rhizomes once every 2-3 weeks, providing just enough moisture to prevent complete drying without promoting rot.
- Storage option: You can harvest all rhizomes in fall and store planting stock in damp peat moss in a cool location around 55-60°F (13-16°C).
- Spring restart: Resume regular watering and move to warmer, brighter conditions in late winter to encourage new growth for the coming season.
Troubleshooting Problems
Troubleshooting ginger plants works like detective work. The symptoms you see are clues that point to specific care issues you can fix. I have dealt with most of these ginger problems over the years and learned how to spot trouble early before it kills the plant.
Virginia Tech says ginger has no major pest or disease issues in most areas. But I have seen ginger yellowing leaves, ginger brown leaves, and ginger root rot happen when care goes wrong. Ginger not sprouting also trips up many new growers.
The guide below gives you a clear system for troubleshooting ginger plants. Match your symptoms to the descriptions below. Then follow the solutions to fix each issue fast.
Yellowing Leaves
- Natural dormancy: Leaves yellowing in fall after 8-10 months of growth indicate natural dormancy approaching. This is normal and signals harvest time rather than a problem.
- Overwatering sign: Yellow leaves during active growth often indicate waterlogged soil causing root suffocation, especially when paired with soft, mushy stem bases.
- Nutrient deficiency: Uniform yellowing across all leaves may signal nitrogen deficiency, which you can correct with balanced liquid fertilizer at recommended rates.
- Temperature stress: Exposure to temperatures below 50°F (10°C) can cause yellowing as the tropical plant reacts to cold stress by reducing chlorophyll production.
- Drainage solution: Improve soil drainage by adding perlite or coarse sand, and reduce watering until the plant shows signs of recovery.
Brown Leaf Tips and Edges
- Illinois Extension diagnosis: Brown leaf tips indicate insufficient water or excessive sun, with both conditions causing similar browning symptoms on leaf margins.
- Underwatering fix: Increase watering to maintain consistent soil moisture, checking daily during hot weather when container soil dries out fast.
- Sun damage solution: Move plants to a location with filtered light or afternoon shade, especially in hot southern climates where direct sun burns foliage.
- Humidity factor: Very dry air can also cause brown tips. This is common with indoor plants during winter when heating systems reduce indoor humidity levels.
- Fertilizer burn: Excessive fertilizer can cause similar browning, so flush the soil with plain water if you suspect too much feeding as the cause.
Root Rot and Soft Rhizomes
- Primary cause: Waterlogged soil and poor drainage are the main causes of root rot, which can kill ginger plants fast once established in the rhizome tissue.
- Virginia Tech prevention: Allow cut rhizome surfaces to callus for several days before planting to prevent rot from entering through fresh wounds.
- Symptoms: Soft, mushy rhizomes with a foul smell indicate advanced rot that may be too severe to save, requiring removal of affected plant material.
- Rescue attempt: If caught early, remove the plant and cut away all rotted tissue with a sterile knife. Allow cuts to callus then replant in fresh well draining soil.
- Prevention focus: Ensure containers have drainage holes, use well draining soil mixes, and never let pots sit in water filled saucers.
Failure to Sprout
- Patience first: Ginger takes 3-8 weeks to sprout according to UVM Extension, so give adequate time before assuming planting failure occurred.
- Temperature check: Rhizomes will not sprout if soil temperature remains below 68°F (20°C), so verify warmth using a soil thermometer before diagnosing problems.
- Growth inhibitors: Store bought ginger may have been treated with sprouting inhibitors that require overnight soaking in warm water to remove before planting.
- Rhizome viability: Old, shriveled, or frozen ginger may have lost viability, so always start with plump, firm rhizomes showing visible growth buds.
- Rot investigation: Dig to check rhizome condition if sprouting seems delayed, looking for soft spots or foul odors indicating rot has occurred underground.
Slow or Stunted Growth
- Temperature limitation: Growth slows when temperatures fall below 55°F (13°C) according to Virginia Tech, so cool conditions are often the primary cause.
- Nutrient need: Slow growth during warm weather may indicate nutrient depletion, especially in containers where regular feeding becomes needed after initial supplies run out.
- Root restriction: Roots circling the container bottom or emerging from drainage holes indicate the pot is too small. Transplant to a larger container.
- Light assessment: While ginger tolerates shade, very low light levels produce thin, weak growth with fewer leaves and smaller rhizome development.
- Water balance: Both over and underwatering stress plants and slow growth, so reassess your watering schedule and soil moisture levels.
Harvesting and Storing Ginger
Harvesting ginger feels like unearthing buried gold from your garden beds. Those fragrant rhizomes have been growing unseen beneath the soil for months. I waited too long to harvest my first crop and missed the baby ginger window that gives you the mildest flavor.
When to harvest ginger depends on what type you want to eat. Baby ginger is ready at just 4 months with thin skin and mild taste. Mature ginger harvest takes 8 to 10 months but gives you rhizomes that work better for storing ginger long term.
USDA research shows each plant can produce 2 to 3 pounds of baby ginger. UVM Extension notes you can store rhizomes in the fridge for 3 months or freeze them for up to 6 months. The table below covers your timing and ginger preservation methods.
5 Common Myths
Ginger can only grow in tropical climates and will not survive in temperate or cold regions of the world.
Ginger grows successfully in cold climates when cultivated in containers that can be moved indoors before temperatures drop below 50F (10C).
You must purchase special seed ginger from nurseries because grocery store ginger will never sprout or grow properly.
Fresh grocery store ginger can grow well after soaking overnight in warm water to remove growth inhibitors, though certified disease-free rhizomes offer more reliable results.
Ginger plants require full direct sunlight for 8 or more hours daily to produce healthy rhizomes for harvesting.
Ginger actually prefers partial shade with only 2-5 hours of direct sunlight daily and can even tolerate full shade, especially in hot southern climates.
Ginger rhizomes are technically roots that grow underground and absorb nutrients from the surrounding soil.
Ginger rhizomes are actually modified underground stems that store nutrients and produce new growth, not true roots despite growing below the soil surface.
Harvesting ginger destroys the entire plant and you must start completely fresh with new rhizomes the following year.
Ginger regenerates when you leave a portion of the rhizome with active growth buds in the soil, allowing the same plant to produce year after year.
Conclusion
You now have everything you need to grow ginger at home from start to finish. I tested these methods over four seasons and they work in any garden setup. The journey starts with selecting plump rhizomes and ends with harvesting your own fresh ginger 4 to 10 months later.
Ginger cultivation success is possible in any climate when you use containers and bring plants indoors for winter. I grow mine in Zone 6 where frost would kill outdoor ginger in weeks. The container method lets you enjoy homegrown ginger no matter where you live.
USDA data shows Hawaii supplies only 20% of U.S. ginger demand. Growing your own helps reduce that import gap while giving you the freshest possible ginger for your kitchen. Nothing beats the flavor of a rhizome you grew and dug up yourself.
Your first harvest will prove that the wait was worth every bit of effort. Check the FAQ section below for answers to common questions about this complete ginger growing guide.
External Sources
Frequently Asked Questions
What is the typical timeline for growing ginger?
Baby ginger takes about 4 months while mature ginger needs 8-10 months to fully develop.
Is it okay to grow ginger from a piece of ginger?
Yes, you can grow ginger from fresh rhizome pieces that have visible growth buds or eyes.
Which plants should stay away from ginger?
Avoid planting ginger near plants that compete for nutrients or attract similar pests.
Is it better to soak ginger before planting?
Soaking ginger overnight in warm water is optional but can help remove growth inhibitors from store-bought rhizomes.
Will ginger regrow after harvesting?
Yes, ginger regrows when you leave a portion of the rhizome with growth buds in the soil after harvesting.
Which month works best for planting ginger?
Plant ginger in late winter to early spring, typically February or March, to give it a full growing season.
How frequently should I water ginger plants?
Water ginger regularly to keep soil consistently moist but never waterlogged, typically every 2-3 days.
Is it possible to eat ginger leaves?
Yes, ginger leaves are edible and can be used to make tea or add flavor to dishes.
What causes my ginger plant leaves to turn yellow?
Yellow ginger leaves may indicate overwatering, nutrient deficiency, or natural dormancy as the plant matures.
Can store-bought ginger be safe to plant?
Store-bought ginger can be planted but may have growth inhibitors that require soaking to remove before planting.