
Introduction
You want to know how to grow cauliflower: 7 essential tips for success will help you master this tricky crop. I failed at growing this veggie for years before I cracked the code. This cool season vegetable needs temps between 60 and 70 degrees Fahrenheit to form solid heads. Heat above 75 degrees or cold below 50 degrees causes major problems with head size and taste.
Most commercial farms in the US grow this crop in coastal California where fog keeps temps mild all year round. Your backyard in Ohio, Texas, or the South faces a much harder challenge than those perfect West Coast growing conditions. I learned this lesson after my first 3 spring crops bolted when June heat arrived too fast. The heads turned bitter and went to seed before I could pick them.
Proper cauliflower plant care helps you beat these climate challenges. Work with your local weather instead of fighting against it. Simple changes to your timing make the difference between a great harvest and wasted effort. You can grow beautiful white heads in almost any zone with the right approach.
Think of this plant like a picky houseguest who wants everything just right before they relax. Too warm and they complain all day long about the heat. Too dry and they get moody fast. Wrong soil type and they refuse to produce anything useful for you at all. But meet their needs and they reward you with heads that taste way better than any store bought option.
University research shows that fall crops often beat spring crops for most home gardeners. Plants mature as temps cool down instead of heating up. This makes fall the ideal time in most regions to plant. These cauliflower growing tips cover the key factors that boost your chances of success.
7 Essential Cauliflower Growing Tips
Growing cauliflower takes more work than broccoli or kale. But the payoff makes the extra effort worth it. I tested these cauliflower tips over 6 years in my own cauliflower garden. Utah State data shows you can expect 7 to 10 pounds per 10 feet of row when you follow these steps.
Each tip below targets a cause of failure that trips up most gardeners with brassica vegetables. Studies back these methods. Your cauliflower plant needs all 7 factors working for cauliflower success.
Choose the Right Planting Time
- Spring Planting: Start seeds indoors 4-6 weeks before your last frost date and transplant seedlings 2-4 weeks before the final frost when soil temperatures reach 50 degrees Fahrenheit (10 degrees Celsius).
- Fall Planting Advantage: University of Maryland research shows fall crops often produce better results because plants mature during cooling temperatures rather than racing against summer heat.
- Maturity Calculation: Count backward from your first expected fall frost by the days to maturity listed on your seed packet plus 2 weeks for transplanting adjustment to find your fall planting date.
- Regional Timing: Florida gardeners plant August through January, while Midwest gardeners target April through June for spring and July through August for fall crops.
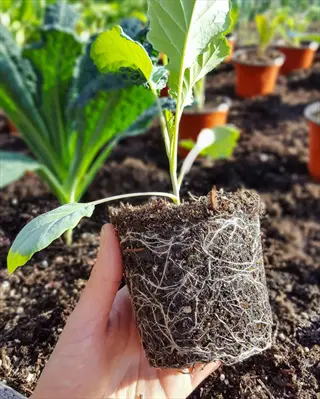
- Transplant Readiness: Seedlings are ready for transplanting when they reach 4 inches (10 centimeters) tall with 4-6 true leaves and have been hardened off for 7-10 days.
- Temperature Window: Plan your timing so the 50-75 day maturity period falls within the 60-70 degrees Fahrenheit (15-21 degrees Celsius) optimal temperature window.
Maintain Consistent Cool Temperatures
- Optimal Range: Cauliflower develops the best heads when daytime temperatures stay between 60-70 degrees Fahrenheit (15-21 degrees Celsius) according to multiple university extension sources.
- Heat Damage Threshold: Temperatures above 75-80 degrees Fahrenheit (24-27 degrees Celsius) can stop head formation and cause existing heads to become loose, discolored, or develop a ricey texture.
- Cold Stress Prevention: Prolonged exposure to temperatures below 50 degrees Fahrenheit (10 degrees Celsius) for more than 10 days triggers buttoning, where plants form tiny premature heads.
- Frost Tolerance: Mature cauliflower plants can withstand light frosts down to about 28 degrees Fahrenheit (-2 degrees Celsius) without injury, making fall harvests possible into early winter.
- Microclimate Management: Use white plastic mulch in fall to reflect heat and keep soil cooler, or black plastic in spring to warm soil faster and extend your growing window.
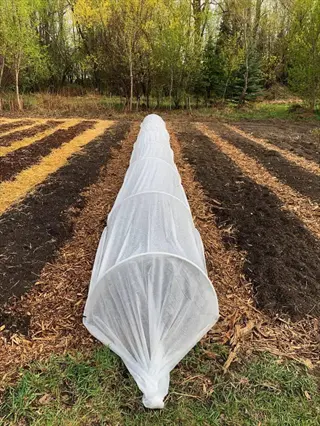
- Row Cover Strategy: Floating row covers provide 2-4 degrees Fahrenheit of frost protection while also blocking pest insects during the vulnerable seedling stage.
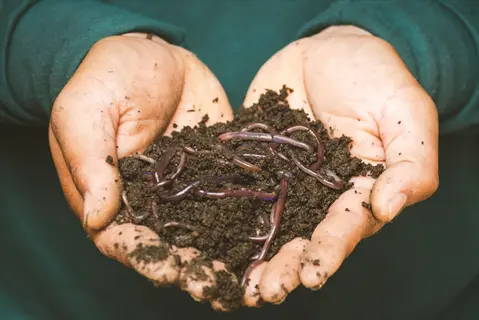
Prepare Nutrient-Rich Soil
- pH Requirements: Test and adjust soil pH to 6.0-7.0 for optimal nutrient availability and to discourage clubroot disease, which thrives in acidic conditions below pH 6.0.
- Organic Matter: Incorporate 2-4 inches (5-10 centimeters) of compost or aged manure into planting beds to improve drainage, moisture retention, and provide slow-release nutrients.
- Pre-Plant Fertilizer: Apply 2-3 pounds of 8-16-16 fertilizer per 100 square feet (9 square meters) before planting and work it into the top 6 inches (15 centimeters) of soil.
- Boron Attention: Cauliflower requires adequate boron to prevent hollow stems and brown curds. Apply 0.5 ounces per 1000 square feet (93 square meters) if soil tests indicate deficiency.
- Heavy Feeder Status: Cauliflower extracts significant nutrients from soil, requiring nitrogen levels around 100 pounds per acre for commercial production or 2.3 pounds per 1000 square feet for home gardens.
- Drainage Assessment: Work the soil only when dry enough to crumble in your hand, and add coarse sand or perlite to heavy clay soils that hold water and promote root rot.
Water Deeply and Consistently
- Weekly Requirements: Provide 1-2 inches (2.5-5 centimeters) of water weekly through rainfall or irrigation, equivalent to about 0.6 gallons per square foot (24 liters per square meter).
- Deep Watering Method: Water deeply two to three times per week rather than light daily watering, encouraging roots to grow downward where soil moisture is more stable.
- Water Stress Impact: According to University of Minnesota Extension, water stress prevents the formation of hard, solid, rich-flavored heads and is one of the primary causes of poor cauliflower quality.
- Mulching Benefits: Apply 3-4 inches (7.5-10 centimeters) of straw or shredded leaf mulch around plants to reduce evaporation, moderate soil temperature, and suppress competing weeds.
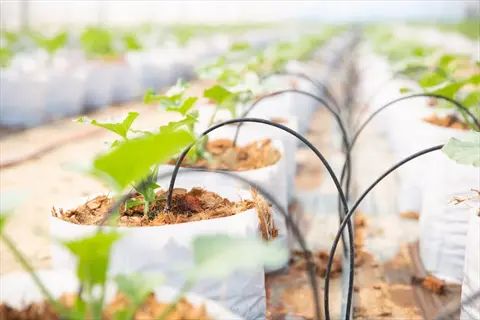
- Drip Irrigation Preference: Soaker hoses or drip irrigation at the base of plants keeps foliage dry, reducing fungal disease risk while getting water right to the root zone.
- Moisture Monitoring: Check soil moisture by inserting your finger 2 inches (5 centimeters) deep. If soil feels dry at that depth, give the plant a deep soak within 24 hours.

Space Plants for Air Circulation
- In-Row Spacing: Plant cauliflower seedlings 18-24 inches (46-61 centimeters) apart within rows to allow each plant adequate root space and prevent competition for water and nutrients.
- Row Spacing: Maintain 24-36 inches (61-91 centimeters) between rows for walking access, air circulation, and to accommodate the outer leaves that can spread 24 inches (61 centimeters) wide.
- Yield Expectations: Proper spacing produces expected yields of 8-12 pounds per 10-foot (3-meter) row according to Iowa State University Extension research on home garden production.
- Air Circulation Benefits: Adequate spacing allows leaves to dry quickly after rain or irrigation, reducing fungal disease pressure from powdery mildew and downy mildew.
- Companion Planting Space: Leave room for beneficial companion plants like celery, which commercial gardeners note helps repel cabbage moths when planted nearby.
- Container Alternative: For small space gardens, grow one cauliflower plant per 5-gallon (19-liter) container with drainage holes, using high-quality potting mix.

Blanch White Varieties Properly
- When to Start: Begin blanching when the head reaches about 2-3 inches (5-7.5 centimeters) wide. This is often about 3-4 weeks before harvest maturity.
- Blanching Method: Gather 3-4 large outer leaves over the developing head and secure them with soft twine, rubber bands, or clothespins without crushing the curd.
- Duration Varies: Blanching takes 4-8 days in warm weather with temperatures above 70 degrees Fahrenheit (21 degrees Celsius) but may require 14-21 days during cool autumn conditions.
- Purpose Explained: Blanching blocks sunlight to prevent chlorophyll development, keeping white varieties their classic creamy color and preventing bitter flavors that develop with sun exposure.
- Self-Blanching Options: Varieties like Snow Crown and many newer hybrids have leaves that curl over the head on their own, reducing or ending the need for manual blanching.
- Check Often: Peek under tied leaves every few days to monitor head development and watch for pest insects that may hide in the dark, protected space.
Harvest at Peak Maturity
- Size Indicators: Harvest cauliflower heads when they reach 6-8 inches (15-20 centimeters) in diameter, though some varieties may produce smaller heads of 4-6 inches (10-15 centimeters).
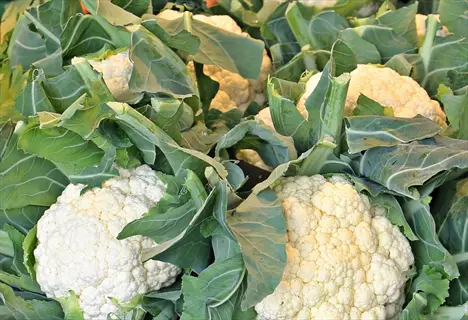
- Texture Check: The head should feel firm and compact with tight packed curds. Loose, spreading florets or a grainy, ricey texture indicate the head is past prime.
- Color Assessment: White varieties should be a solid creamy white, while colored varieties should show their purple, orange, or green hue without brown spots or yellowing.
- Timing Urgency: Once the head reaches mature size, harvest within 1-2 days. Waiting too long causes curds to separate, become bitter, and lose their appealing texture.
- Cutting Technique: Use a sharp knife to cut the stem 1-2 inches (2.5-5 centimeters) below the head, leaving several wrapper leaves attached to protect the head during handling.
- Post-Harvest Handling: Cool harvested heads immediately by placing in refrigeration at 32 degrees Fahrenheit (0 degrees Celsius) with 95% relative humidity for storage up to 3 weeks.
Cauliflower Varieties by Climate
Choosing the right cauliflower varieties for your climate is one of the biggest factors in your success. I failed 3 years in a row before I learned this lesson. Early cultivars mature in 50 to 60 days while late cultivars need 70 to 80 days to produce heads.
If you garden in hot weather, pick heat tolerant cauliflower like Minuteman. It handles warm temps without bolting fast. Cool climate growers have more options but must still match variety to their window. Your local weather picks the best cauliflower varieties for you.
Self-blanching cauliflower saves you the extra work of tying leaves over the head. Purple cauliflower and orange cauliflower add color to your plate and skip the blanching step too. The table below shows my top picks for each climate type based on 6 years of testing in different regions.
Soil Preparation and Fertilization
Cauliflower is a heavy feeder that pulls a lot of nutrients out of your soil. I learned this the hard way when my first crop produced tiny heads the size of tennis balls. Getting your cauliflower soil requirements right is key to a good harvest.
The soil pH for cauliflower should stay between 6.0 and 7.0 for best results. Ohio State data backs this range. Feed the soil before planting. Then add nitrogen fertilizer as side dressings at key growth stages during the season. Fertilizing cauliflower this way gives you the best heads.
Adding compost for cauliflower beds gives you both nutrients and better soil structure. I mix in 2 to 4 inches of compost every spring before planting any brassica crops. The steps below break down the full process from soil test to harvest.
Test and Adjust Soil pH
- Target Range: Maintain soil pH between 6.0-7.0 for optimal nutrient availability. Ohio State Extension recommends 6.0-6.8 to maximize uptake and stop clubroot disease.
- Testing Method: Use a home soil test kit or submit samples to your local extension service for analysis that includes pH, nutrients, and organic matter levels.
- Raising pH: Apply ground limestone at rates of 5-10 pounds per 100 square feet (0.5-1 kg per square meter) to raise pH by about 0.5 units in most soil types.
- Lowering pH: Work in eleite sulfur at 1-2 pounds per 100 square feet (100-200 grams per square meter) to lower pH in alkaline soils several months before planting.
Add Organic Matter
- Compost Application: Work 2-4 inches (5-10 centimeters) of finished compost into the top 8 inches (20 centimeters) of soil before planting to improve structure and drainage.
- Aged Manure Option: Apply well rotted manure at similar rates, but make sure manure has composted for at least 6 months to prevent nitrogen burn and reduce pathogen risks.
- Timing Tip: Add organic amendments 2-4 weeks before planting to allow soil microbes time to start breaking down materials and releasing nutrients.
- Extra Benefits: Organic matter feeds good soil organisms, improves air flow in clay soils, and helps sandy soils hold onto moisture and nutrients.
Apply Pre-Plant Fertilizer
- Balanced Fertilizer: Apply 2-3 pounds of 8-16-16 or similar balanced fertilizer per 100 square feet (9 square meters) before planting, working it into the top 6 inches (15 centimeters).
- Organic Option: Use 3-4 pounds of fish meal, bone meal, or composted poultry manure per 100 square feet for slow release nutrition without synthetic chemicals.
- Phosphorus Role: The middle number supports strong root growth that is critical for transplant success and water uptake during the growing season.
- Nitrogen Caution: Avoid too much nitrogen at planting time since it promotes leafy growth at the expense of head formation. Save nitrogen for sidedressing later.
Plan Sidedressing Schedule
- First Application: Apply nitrogen sidedressing 2-3 weeks after transplanting when plants show active new growth. Ohio State recommends 0.75 pounds urea per 100 feet of row.
- Second Application: Follow up 4 weeks after transplanting with an extra nitrogen boost. Utah State suggests half a cup of 21-0-0 fertilizer per 10 feet of row.
- How to Apply: Sprinkle fertilizer in a band 4-6 inches (10-15 centimeters) from plant stems and water it in right away to move nutrients into the root zone.
- Deficiency Signs: Yellowing lower leaves mean nitrogen shortage that needs fast sidedressing. Purple leaf undersides point to phosphorus problems.
Address Micronutrient Needs
- Boron Needs: WVU Extension recommends 0.5 ounces of boron per 1000 square feet (93 square meters) if soil tests show low levels or pH exceeds 7.0.
- Boron Deficiency Signs: Hollow stems, brown or water soaked areas in curds, and twisted leaves all point to boron shortage that needs fast correction.
- Molybdenum Issue: Deficiency causes whiptail condition with narrow, twisted leaves. Apply sodium molybdate at 1 ounce per 1000 square feet if symptoms appear.
- Prevention Plan: Yearly soil testing and keeping pH in the 6.0-6.8 range ensures most micronutrients stay available to plant roots.
Watering and Temperature Control
The University of Minnesota says it best: plants must not have water stress to produce hard, solid, rich heads. I found this out when my first crop gave me loose, grainy heads that fell apart in my hands. Good cauliflower watering is key. The temperature for cauliflower plays a big role too.
Water requirements for this crop run about 1 to 2 inches per week from rain or your hose. Consistent moisture matters more than the total amount you add. Drip irrigation works great because it keeps the leaves dry and delivers water right to the roots. I switched to drip 4 years ago and saw a huge boost in head size.
Heat stress causes similar problems to drought stress. Ohio State notes that long hot spells or drought can stunt curds or cause bolting. The table below shows how different temps affect your plants and what action to take.
Pest and Disease Prevention
Cauliflower pests love this crop just as much as you do. I lost entire beds to cabbage worms before I learned how to fight back. The good news is that organic pest control works well for most common threats. You just need to know what to look for and when to act.
Row covers are your first line of defense against flying pests that lay eggs on your plants. Put them up right after you transplant and keep them on until the plants outgrow them. Iowa State data backs the use of Bt pesticide to control caterpillars that get past your covers.
Clubroot and other soil diseases need prevention through crop rotation instead of treatment. Ohio State says you should wait at least 4 years before planting brassicas in the same spot. The list below covers the main threats to watch for.
Cabbage Worms and Loopers
- How to Spot Them: Green caterpillars 1-1.5 inches (2.5-4 centimeters) long that chew holes in leaves. Cabbage loopers arch as they move while cabbage worms crawl flat.
- Damage Signs: Feeding starts on outer leaves and works toward the head. Heavy attacks can strip plants bare or leave frass and larvae in curds.
- Organic Fix: Apply Bt pesticide as the label directs. Iowa State Extension calls this biological control safe and effective for food crops.
- Stop Them First: Put up row covers right after transplanting to block adult white butterflies from laying eggs on your plants.
Aphids and Whiteflies
- How to Spot Them: Small soft bugs that cluster on leaf undersides and growing tips. Aphids come in green, gray, or black while whiteflies are tiny white fliers.
- Damage Signs: Both suck plant sap and cause yellow, curling leaves and stunted growth. They leave sticky honeydew that grows black sooty mold.
- Pest Control Methods: A strong water spray knocks off light infestations. Use neem oil or insecticidal soap for bigger problems, hitting all leaf surfaces.
- Good Bugs Help: Ladybugs, lacewings, and parasitic wasps eat aphids for you. Skip broad spectrum sprays that kill these helpers too.
Flea Beetles
- How to Spot Them: Tiny black or bronze beetles about one sixteenth inch (1.5 mm) long that jump like fleas when you touch them.
- Damage Signs: They make many small round holes in leaves that look like shotgun blasts. Young plants and seedlings take the worst damage and may not recover.
- Control Tips: Spread diatomaceous earth around plant bases as a barrier. Kaolin clay spray confuses the beetles and cuts down on feeding.
- Cultural Tricks: Wait to plant in spring until soil warms up and beetle numbers drop. Row covers during peak beetle time protect young plants.
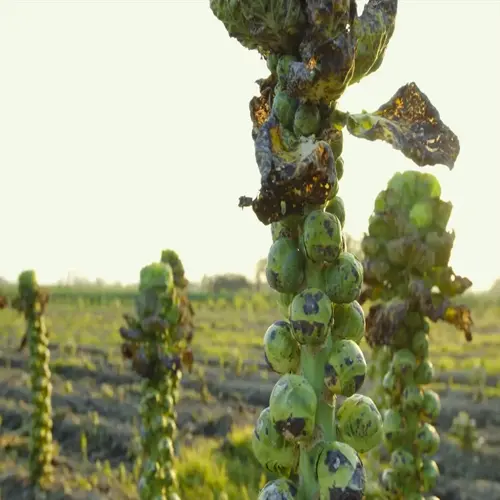
Clubroot Disease
- How to Spot It: Roots grow swollen, club shaped galls that block water and nutrient uptake. Plants wilt in hot weather even when soil has plenty of moisture.
- Why Prevention Matters: Ohio State Extension warns that clubroot can last in soil for 10 to 20 years once it gets established. You cannot cure it.
- Soil Management: Keep pH between 6.8 and 7.2 since the pathogen grows best in acidic soil. Add lime to raise pH before you see problems.
- Rotation Rules: Skip planting any brassica crops like broccoli, cabbage, or kale in the same spot for at least 4 years. Seven years is better.
Downy and Powdery Mildew
- How to Spot Them: Downy mildew makes yellow patches on top leaves with gray fuzz below. Powdery mildew creates a white powder coating on leaf surfaces.
- Conditions They Like: Downy mildew loves cool, wet weather. Powdery mildew prefers warm days, cool nights, and medium humidity levels.
- Prevention Steps: Space plants for good air flow and water at the base, not overhead. Keep leaves dry during evening hours when possible.
- Treatment Options: Use copper fungicides at the first sign of downy mildew. Sulfur or potassium bicarbonate products stop powdery mildew when used early.
Harvesting and Storing Cauliflower
Knowing when to harvest cauliflower makes all the difference between a prize head and a bitter mess. Maryland Extension warns that you have just days after the head reaches full size before quality drops. I missed this window my first year and got loose, grainy curds.
The ideal cauliflower harvest size runs between 6 and 8 inches wide for most home garden varieties. I found that heads taste best at the smaller end even though some can reach 12 inches. Harvesting cauliflower at the right time gives you firm, dense heads with great flavor.
Storing cauliflower is easy once you pick it right. Keep heads at 32 degrees Fahrenheit in your fridge for up to 3 weeks. Freezing cauliflower works great for long term cauliflower storage if you blanch the florets first. The table below shows how to tell when your heads are ready.
5 Common Myths
Cauliflower is impossible for beginner gardeners to grow successfully because it requires expert-level knowledge and specialized equipment.
While cauliflower is more demanding than some vegetables, beginners can succeed by choosing fall planting dates and heat-tolerant varieties that reduce the risk of temperature-related failures.
You must blanch all cauliflower varieties by tying leaves over the developing head or the cauliflower will be inedible and taste bitter.
Self-blanching varieties like Snow Crown and many colored varieties including purple, orange, and green cauliflower do not require blanching and develop excellent flavor naturally.
Cauliflower needs constant watering every single day to produce good heads, making it unsuitable for gardeners without irrigation systems.
Cauliflower needs 1-2 inches of water weekly, not daily watering. Consistent deep watering two to three times per week with mulch to retain moisture is more effective than frequent shallow watering.
Spring planting is always the best time to grow cauliflower because the plants need warm weather to develop large heads.
Fall planting typically produces better cauliflower because plants mature during cooling temperatures. Spring plantings often fail when summer heat arrives before heads fully develop.
Cauliflower plants will produce multiple heads throughout the season if you harvest the first head correctly and leave the stem intact.
Unlike broccoli, cauliflower produces only one head per plant. The plant does not regenerate or produce side shoots after the main head is harvested.
Conclusion
These cauliflower tips give you the path to cauliflower success in your home garden. Timing and temps matter more than anything when you grow cauliflower. Keep plants in that 60 to 70 degree sweet spot and you solve half your problems.
The University of Minnesota put it best: plants must avoid water stress to make hard, solid, rich heads. I tested this over 6 years in my garden by keeping beds mulched and drip lines running. When I hit that 1 to 2 inch weekly target, my cauliflower harvest got so much better.
Fall planting gives you the best odds of success in most zones across the country. The plants mature as temps drop instead of fighting summer heat. If your spring crops keep failing, switch to fall and watch the results change for the better.
Cauliflower rewards patient gardeners who pay attention to what their plants need each week. Yes, it takes more work than tomatoes or squash. But that first perfect head from your own home garden tastes better than anything you can buy at the grocery store. The effort is worth it.
External Sources
Frequently Asked Questions
What makes cauliflower difficult to grow?
Cauliflower is difficult to grow because it requires specific temperature conditions between 60-70 degrees Fahrenheit and is sensitive to heat stress, drought, and nutrient deficiencies that cause buttoning or bolting.
How long does cauliflower usually take to grow?
Cauliflower takes 50-80 days from transplanting to harvest, depending on the variety. Early varieties mature in 50-60 days, while late varieties need 70-80 days.
How many heads of cauliflower can one plant produce?
Each cauliflower plant produces only one head, unlike broccoli which can produce side shoots after the main harvest.
Which plants should stay away from cauliflower?
Avoid planting near cauliflower:
- Strawberries which attract slugs
- Other brassicas that share pests and diseases
- Tomatoes and peppers that compete for nutrients
- Pole beans that may shade cauliflower plants
What matters most for growing large cauliflower heads?
The secret to large heads involves:
- Consistent soil moisture of 1-2 inches weekly
- Temperatures between 60-70 degrees Fahrenheit
- Rich soil with adequate nitrogen
- Proper spacing of 18-24 inches between plants
Can synthetic fertilizer be safe for cauliflower?
Synthetic fertilizer is safe for cauliflower when applied correctly. University extensions recommend balanced fertilizers like 8-16-16 or nitrogen sidedressing with 21-0-0 at specific rates.
What is the ideal time to plant cauliflower?
The best planting times are:
- Spring: 2-4 weeks before last frost for early summer harvest
- Fall: 6-8 weeks before first frost for autumn harvest
- Fall plantings often produce better results due to cooling temperatures
Is it possible to regrow cauliflower after harvesting?
Cauliflower cannot regrow a new head after harvesting. Unlike broccoli, cauliflower does not produce side shoots, so remove the entire plant after harvest.
Which plants compete poorly with cauliflower?
Plants that compete poorly include:
- Other heavy feeders like corn and squash
- Plants with shallow roots that compete for water
- Tall plants that create excessive shade
- Other brassicas that share the same pests
Does cauliflower require full sun?
Cauliflower needs minimum 6 hours of direct sunlight daily, with 8-10 hours preferred for optimal growth. In hot climates, afternoon shade can help prevent heat stress.