
Introduction
The Complete Guide to Harden Off Seedlings starts with one truth most new gardeners learn too late. You spend weeks nursing seeds under grow lights and watching stems push through soil. Then you move them outside on a warm spring day and watch them wilt and die within hours. That's transplant shock, and it kills more young plants each spring than pests or disease ever will.
I lost a full tray of tomato starts my first year because I skipped this step. In my experience, indoor seedlings react like someone stepping from a dark theater into bright noon sun. The shock hits hard and fast. Hardening off seedlings gives your plants time to build thicker cell walls and store extra carbs. Their roots grow stronger and their cells become more resistant to freezing on cold nights.
What most guides miss is that over-hardening is just as harmful as skipping the process. Too much cold stunts cauliflower heads and stops cucumber growth dead in its tracks. Research from Maryland Extension backs this up. Getting the balance right means your plants get tough without taking real damage along the way.
Seven extension programs from top universities back this complete guide. You'll find a 7 day schedule and crop specific temperature limits inside. When I first started, I wished someone had given me the indoor prep steps and problem fixes I share here. Your seedlings will be tough and ready for the garden bed from their very first day in the ground.
7-Day Hardening Off Schedule
This 7 day hardening off schedule gives you a step by step harden off plan that takes the guessing out of it. I tested this method over 4 spring seasons and it works for both cool and warm season crops. Start this schedule 7 to 10 days before your area's last frost date for cool season plants. Warm season crops should wait until nights stay above 50°F.
Day 1 is about gradual exposure seedlings to outdoor air for the first time. Set your trays outside in full shade between 12 and 5 PM for 2 to 3 hours only. Pick a spot blocked from wind. Check your seedlings after the first hour. If leaves start to droop, bring them in right away. Cool season crops can handle temps down to 45°F but bring seedlings inside at night no matter what.
Day 2 and 3 you bump up exposure time. Give your seedlings 3 to 4 hours outside with some dappled sun mixed in. Move trays where they catch morning light but dodge the harsh afternoon rays. In my experience, this is when most new growers push too hard too fast. Keep warm season crops like tomatoes and peppers away from any wind on these days.
Day 4 and 5 is when things ramp up. Your seedlings should now spend 5 to 6 hours outside in a mix of partial and full sun. You'll notice stems getting firmer by this point. Cool season crops like broccoli and kale can handle a wider range of conditions now. Warm season crops still need to come back inside before temps drop below 55°F at night.
Day 6 marks a big shift in your hardening off schedule. Leave seedlings out for the full day and through the first night if temps stay above 45°F for cool season crops or above 60°F for warm season types. I always check the forecast before leaving trays out overnight. One surprise frost can wipe out a week of progress.
Day 7 is graduation day. Your seedlings stay outside for a full 24 hours with no protection. If they look strong and show no wilting, they're ready for the garden bed. Watch for pink or purple coloring on stems and leaf veins. That color comes from a pigment called anthocyanin and it's a sign your plants have built up their defenses. Transplant on a cloudy morning for the best results.
Science Behind Hardening Off
Most guides tell you what to do but never explain why harden off seedlings in the first place. The answer comes down to 6 real changes that happen inside your plants during the process. I tested seedlings side by side for 3 seasons and could see the difference without a magnifier.
When you expose seedlings to outdoor stress, their cells launch a seedling stress response that changes how the whole plant is built. Cell wall thickening starts within the first few days as lignin fills the gaps in soft tissue. Think of lignin like rebar in concrete. It makes stems rigid enough to stand up against wind and rain. The cuticle waxy coating on leaves also gets thicker, which locks in moisture that would escape on a dry windy day.
Plants also shift their energy from growing tall to storing fuel. Carbs pile up in stems and roots as the growth rate slows down. These stored sugars are what keep your plants alive after transplant shock hits during the move to the garden. At the same time, cells push out extra water and replace it with sugars that lower the freezing point. In my experience, this is why hardened tomatoes survive a light frost that kills soft ones.
You can see the results with your own eyes if you know what to look for. Pink or purple coloring on stems and leaf veins means your plants are producing anthocyanin. That pigment shows up when cell walls get stronger and is a reliable sign that hardening worked. No other guide shares this visual marker, but it's one of the best ways to know your seedlings are ready.
Cell Wall Thickening
- What changes: Lignin deposits form within the cell walls of stems and leaves, converting soft and flexible tissue into firm and resilient plant structures.
- Why it matters: Thicker cell walls give seedlings the structural strength to withstand outdoor wind gusts and heavy rain without snapping or bending for good.
- How long it takes: Measurable lignin accumulation begins within the first 3 to 5 days of outdoor exposure and continues strengthening throughout the full hardening period.
Cuticle Wax Development
- What changes: The waxy layer on leaf surfaces thickens quite a bit, creating a protective barrier that reduces moisture loss through transpiration during hot or windy conditions.
- Why it matters: Indoor-grown seedlings have thin cuticles because humid indoor air does not trigger wax production, leaving them vulnerable to rapid dehydration outdoors.
- How long it takes: Cuticle wax begins thickening within the first few days of outdoor exposure and reaches protective levels after about one week of gradual hardening.
Carbohydrate Accumulation
- What changes: Seedlings store extra sugars and starches in their tissues as energy reserves, providing fuel for new root growth and recovery after the stress of transplanting.
- Why it matters: Plants with higher carbohydrate reserves establish faster after transplanting because they have stored energy to grow new roots and recover from transplant shock.
- How long it takes: Carbohydrate reserves build up over the 7 to 14 day hardening period as the plant slows top growth and redirects energy into storage.
Freeze-Prone Water Reduction
- What changes: Cells reduce their water content and replace some of it with dissolved sugars and other solutes, which lowers the freezing point of cellular fluid.
- Why it matters: Seedlings with less freeze-prone water tolerate brief cold snaps without ice crystals forming inside their cells and rupturing delicate cell membranes.
- How long it takes: This adjustment happens bit by bit throughout the hardening period, with cool-season crops reaching meaningful cold tolerance within 7 to 10 days.
Root System Stimulation
- What changes: Reduced watering and exposure to mild outdoor stress signals the plant to invest more energy in root development rather than leaf and stem elongation.
- Why it matters: Stronger root systems anchor plants better after transplanting and can absorb water and nutrients more efficiently from garden soil immediately after planting.
- How long it takes: Root growth shifts become noticeable within the first week, and by the end of a 14 day hardening period roots are much more developed.
Temperature Thresholds by Crop
The hardening off temperature your crop needs depends on whether it's a cool season or warm season plant. I learned this the hard way when I put pepper starts outside on a 48°F night and watched them stall for 2 weeks. Cold hardy seedlings like kale handle temperatures down to 40°F after proper hardening. Warm season seedlings need much warmer nights to keep growing.
The table below shows you the minimum temperature seedlings outside can handle for each crop group. Your cool season seedlings go out first in spring because they can take the cold. You must wait with your warm season seedlings until nights stay above their minimum. Push them out too soon and you risk over-hardening seedlings for good.
Pay close attention to the over-hardening risks in the last column. Your cauliflower and broccoli will bolt if you leave them out in temps below 40°F for too long. Your cucumbers and melons are even more sensitive and can stunt if nights dip below 50°F. I keep a cheap outdoor thermometer next to my seedling trays so you can track the real temperature where your plants sit.
Pre-Hardening Indoor Preparation
Most growers skip to outdoor exposure without doing any indoor prep first. I found that you get much better results when you prepare seedlings for hardening while they're still inside. This indoor prep phase takes about 5 to 7 days and gives your plants a head start before they face real outdoor stress. Think of it as a warm up before the main workout.
You want to reduce watering before hardening and stop fertilizing seedlings about 5 days out. A fan to strengthen stems does wonders for building sturdy plants before they face real wind. These steps help your indoor seedlings outdoors transition go much smoother. I started doing indoor prep after my second season and lost far fewer plants during the move outside.
7 Days Before: Reduce Watering
- Action: Cut your watering frequency by about half, allowing the top inch (2.5 centimeters) of soil to dry between waterings instead of keeping it moist at all times.
- Purpose: Reduced watering encourages roots to grow deeper in search of moisture and triggers the plant to begin storing carbohydrates rather than pushing new leaf growth.
- Caution: Never let seedlings wilt severely or dry out all the way during this phase because root damage at this stage will weaken rather than strengthen the plant.
5 Days Before: Stop All Fertilizer
- Action: Discontinue all liquid fertilizer, fish emulsion, and any other nutrient supplements to your seedlings for the remainder of the hardening period.
- Purpose: Stopping fertilizer slows the production of tender new growth, which is the most vulnerable tissue to outdoor stress from sun, wind, and cold temperatures.
- Caution: Resume feeding with a diluted fertilizer solution only after seedlings have been fully transplanted and show signs of active new growth in the garden.
4 Days Before: Run a Fan Nearby
- Action: Place a small oscillating fan near your seedlings and run it on low for 2 to 3 hours per day to simulate gentle outdoor breezes across the stems and leaves.
- Purpose: Mechanical stress from air movement stimulates stems to grow thicker and sturdier, giving seedlings better resistance to outdoor wind before they ever step outside.
- Caution: Keep the fan on a low setting and position it at least 12 inches (30 centimeters) away to avoid drying out soil too fast or causing physical stem damage.
2 Days Before: Lower Indoor Temperature
- Action: Turn off heat mats underneath seedling trays and reduce room temperature by 5 to 10 degrees if possible, especially during nighttime hours.
- Purpose: Cooler indoor temperatures begin the acclimation process in a gentle way before seedlings face the full range of outdoor temperature swings for the first time.
- Caution: Do not drop indoor temperatures below 55°F (12.8°C) for warm-season crops or below 45°F (7.2°C) for cool-season crops.
Troubleshooting Hardening Problems
Every gardener runs into problems during hardening, and I've seen each of these issues in my own trays at some point. Seedling sunburn is the one I see most often. Seedling wilting after hardening off and yellowing leaves hardening off come in close behind. The good news is that all 3 have simple fixes when you catch them early.
Utah State Extension says that some leaf scorch and browning is normal during this process. Your plants are growing new foliage built for outdoor life. Don't panic if you see a few yellow lower leaves. But if you spot leaf scorch seedlings across the whole plant or premature flowering seedlings, you need to act fast. Over-hardening seedlings with too much cold is often the cause.
Leaf Scorch and Sunburn
- What you see: White, bleached, or brown crispy patches appear on leaves, most often on the upper surfaces that received the most direct sunlight exposure during hardening.
- Why it happens: Indoor-grown leaves lack the protective cuticle wax and pigments needed to handle direct ultraviolet radiation, and too much sun too soon overwhelms their defenses.
- What to do: Move seedlings back to full shade for 2 days, trim severely damaged leaves if they are more than half scorched, and restart sun exposure with shorter time periods.
Severe Wilting Outdoors
- What you see: Seedlings droop dramatically within hours of being placed outside, with leaves hanging limply and stems bending under their own weight despite moist soil.
- Why it happens: Wind and sun cause rapid water loss through transpiration that exceeds what underdeveloped root systems can replace, creating a temporary water deficit in leaves.
- What to do: Move seedlings to a wind-sheltered shaded spot right away, water lightly, and reduce the next outdoor session by 1 to 2 hours until plants no longer wilt.
Yellowing or Dropping Leaves
- What you see: Lower leaves turn yellow and may drop off during the first week of outdoor exposure, while newer leaves at the top of the plant remain green and healthy.
- Why it happens: The plant redirects resources from older leaves to grow new foliage adapted to outdoor conditions. Utah State Extension confirms some yellowing is normal during this process.
- What to do: Leave the plant alone if only lower leaves are affected and new growth looks healthy. Bring seedlings inside only if yellowing spreads fast to upper leaves and new growth.
Premature Flowering or Bolting
- What you see: Cool-season crops like broccoli, cauliflower, or cabbage begin producing flower buds or elongated flower stalks before the plant has reached a harvestable size.
- Why it happens: Exposure to temperatures below 40°F (4.4°C) for extended periods triggers a cold vernalization response that signals the plant to shift from growth to reproduction.
- What to do: Avoid hardening cool-season crops when nighttime temperatures drop below 40°F (4.4°C) and bring them indoors on unusually cold nights to prevent triggering bolting.
Stunted Growth After Hardening
- What you see: Seedlings stop growing at all during or after the hardening off period, producing no new leaves or visible stem elongation for a week or more after transplanting.
- Why it happens: Over-hardening or exposing warm-season crops to temperatures below their threshold causes cellular stress that stalls growth. Cucumbers and melons are the most prone to this.
- What to do: Ensure warm-season crops are not exposed below 50°F (10°C) and limit the hardening period to 7 to 10 days maximum for cold-sensitive varieties.
Tools and Equipment Guide
The right tools make hardening off faster and less stressful for both you and your plants. I wasted 2 full seasons carrying trays by hand before I got smart about this. You don't need every item on this list, but having the best tools hardening off requires will save you a lot of time. I've sorted these from budget picks to more advanced season extenders seedlings need for extra protection.
Cold frame hardening off is the method I use most because it cuts my daily work in half. A mini greenhouse seedlings setup works great too if you have a porch or small patio. For the early shade days, a simple shade cloth seedlings cover blocks harsh sun. And frost cloth seedlings need on cold nights costs just a few dollars. Here are the 6 tools I use and recommend.
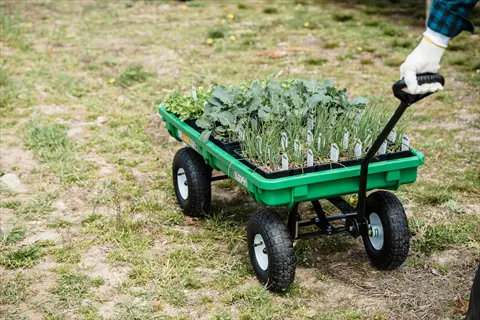
Wheeled Garden Cart or Wagon
- Best for: Daily transport of seedling trays between indoor and outdoor locations without straining your back or risking tray drops and soil spills.
- How it helps: Michigan State Extension recommends a wheeled wagon to simplify the daily moving process during the 7 to 14 day hardening schedule.
- What to look for: Choose a flat-bed style cart with raised edges that can hold multiple standard 10 by 20 inch (25 by 50 centimeter) seedling trays secure.
- Budget option: A basic utility wagon with solid wheels works well on paved surfaces and costs between 30 and 60 dollars at most garden centers.
- Pro tip: Park the loaded cart in different spots each day to control sun exposure levels without lifting individual trays over and over.
- Size guide: A cart measuring at least 24 by 36 inches (61 by 91 centimeters) holds 4 to 6 standard seedling trays at once.
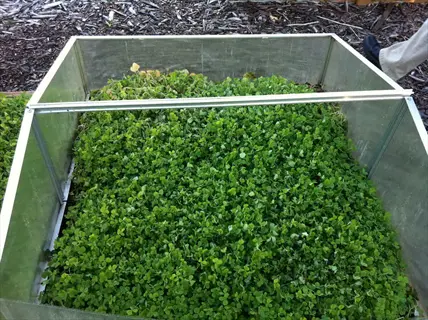
Portable Cold Frame
- Best for: Providing a controlled transition space where seedlings get outdoor air and light while staying safe from wind and sharp temperature drops.
- How it helps: Cold frames let you prop the lid open at different heights to control airflow and temperature, making gradual exposure much easier to manage.
- What to look for: A hinged lid design with adjustable props lets you open the frame by 2 inches (5 centimeters) on day one and all the way open by day 5 or 6.
- Budget option: Build a simple cold frame using an old window or clear polycarbonate sheet on top of a wooden box for under 25 dollars in materials.
- Pro tip: Place a thermometer inside because temperatures can climb 20 to 30°F (11 to 17°C) above outdoor air on sunny days.
- Size guide: A 2 by 4 foot (0.6 by 1.2 meter) cold frame fits most home garden hardening needs and holds 2 to 3 standard seedling trays.
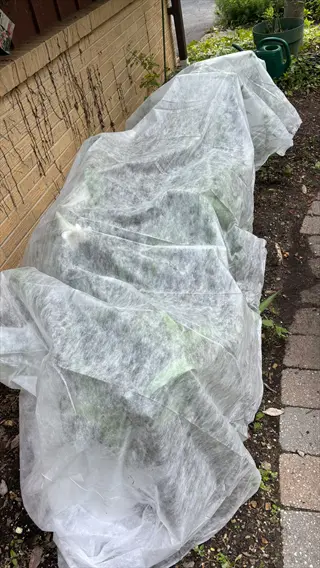
Frost Cloth or Row Cover
- Best for: Emergency cold protection when surprise temperature drops threaten seedlings that are partway through the outdoor hardening process.
- How it helps: Lightweight frost cloth provides 2 to 8°F (1 to 4.4°C) of frost protection while still allowing light, air, and moisture to reach your plants.
- What to look for: Choose a spun-bonded polypropylene fabric rated for light frost protection, often labeled as 0.5 or 1.0 ounce (14 or 28 gram) per square yard.
- Budget option: A 10 by 30 foot (3 by 9 meter) roll of lightweight frost cloth costs under 15 dollars and you can reuse it for multiple seasons with careful storage.
- Pro tip: Drape frost cloth loose over seedlings without crushing them and secure edges with rocks or clips to keep wind from lifting the fabric at night.
- Size guide: Keep at least one 10 foot (3 meter) section on hand during the hardening period so you can cover seedlings fast when cold weather shows up.
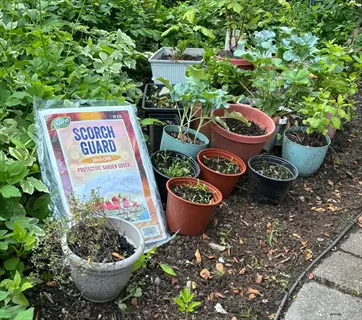
Shade Cloth Panel
- Best for: Creating filtered light conditions during the first 2 to 3 days of hardening when seedlings need outdoor air exposure without the full strength of direct sunlight.
- How it helps: A 50% shade cloth blocks half the incoming sunlight while still allowing air flow and temperature acclimation, and it prevents leaf scorch on tender seedlings.
- What to look for: Select a knitted shade cloth with 40 to 50% shade rating that is UV-stabilized for outdoor use over multiple growing seasons.
- Budget option: A 6 by 12 foot (1.8 by 3.6 meter) shade cloth panel costs between 10 and 20 dollars and can double as summer heat protection for lettuce beds.
- Pro tip: Attach the shade cloth to a simple PVC pipe frame that you can place over seedling trays and remove as you increase sun exposure each day.
- Size guide: A panel large enough to cover your seedling staging area plus 12 inches (30 centimeters) of overhang on each side blocks angled afternoon sun.
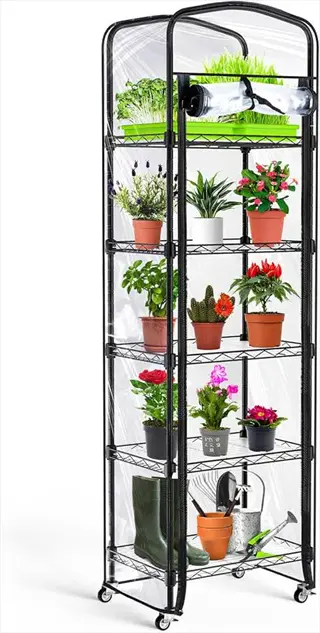
Portable Mini Greenhouse
- Best for: Gardeners with limited space who need an enclosed hardening station that protects seedlings from wind and pests while offering adjustable ventilation openings.
- How it helps: Garden Betty recommends portable mini greenhouses as a shortcut for hardening off because they buffer temperature swings and cut the need to carry trays indoors every day.
- What to look for: Choose a walk-in or tiered shelf model with zippered openings on multiple sides so you can control ventilation and ramp up outdoor air exposure over time.
- Budget option: A 4 tier wire shelf greenhouse with a zip-up plastic cover costs between 25 and 50 dollars and holds dozens of seedling pots on each shelf level.
- Pro tip: Unzip the front panel a few inches on day one and open it wider each day to mimic the gradual exposure schedule without moving trays back and forth.
- Size guide: A 27 by 19 by 63 inch (69 by 48 by 160 centimeter) tiered model fits on a patio, balcony, or small deck and holds most home garden seedling collections.
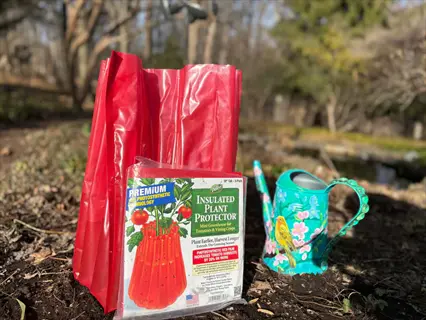
Wall-o-Water Season Extender
- Best for: Protecting individual transplants that have finished hardening off but still face cold nighttime temperatures in the first 1 to 2 weeks after being planted in the garden.
- How it helps: Water filled plastic tubes absorb solar heat during the day and release it at night, keeping temperatures 10 to 15°F (5.5 to 8.3°C) warmer inside.
- What to look for: Original Wall-o-Water brand or similar water filled teepee style protectors built to surround a single plant and stand upright without extra support.
- Budget option: A 3 pack of Wall-o-Water protectors costs about 15 to 20 dollars and you can reuse them across multiple growing seasons with careful handling.
- Pro tip: Fill each tube about three quarters full with water and set them around transplants 1 to 2 weeks before your last frost date to extend the growing season.
- Size guide: Standard Wall-o-Water units measure 18 inches (46 centimeters) tall and fit tomato, pepper, and eggplant transplants up to about 12 inches (30 centimeters) tall.
5 Common Myths
Hardening off seedlings only takes one or two days of outdoor exposure before they are ready to transplant permanently.
University extension research consistently recommends a gradual 7 to 14 day hardening process because physiological changes like cell wall thickening and cuticle development take time to complete.
All seedlings need the exact same hardening schedule regardless of whether they are cool-season or warm-season crops.
Cool-season crops like broccoli tolerate 40F (4.4C) after hardening while warm-season crops like tomatoes and peppers need nighttime temperatures above 60F (15.5C).
Placing seedlings in full direct sunlight on the first day outside gives them the strongest start possible.
Full sun on day one causes leaf scorch and severe wilting. Start with 2 to 3 hours in full shade or dappled light and increase sun exposure gradually over the first week.
Seedlings purchased from a garden center or nursery never need to be hardened off before planting in the garden.
Store-bought seedlings grown under controlled greenhouse conditions still benefit from 3 to 5 days of outdoor acclimation before permanent transplanting into the garden.
Keeping seedlings outside for as long as possible during hardening is always better and cannot cause any harm.
Over-hardening causes real damage: cauliflower produces stunted heads, cucumbers and melons stop growing, and hardy seedlings exposed below 40F (4.4C) may flower prematurely.
Conclusion
You now have everything you need to harden off seedlings the right way. This complete guide covered indoor prep and a 7 day outdoor schedule. You also got crop specific temperature limits and fixes for common setbacks. These steps work because they trigger real changes inside your plants. Cell walls get thicker, roots grow deeper, and leaves build a wax coating that locks in moisture.
I started keeping a simple hardening journal after my third season of growing. Each day I wrote down the temperature, hours outside, and how my plants looked. After 2 years of notes, I could tell which seedlings were ready for outside before they even showed signs. Knowing your seedlings ready for outside markers saves you a lot of guessing. I'd encourage you to do the same. Your notes will become your most valuable garden tool over time.
Hardening off seedlings separates growers who lose half their starts from those who transplant seedlings outdoors with no losses. When you follow a proven schedule, your plants build the strength they need to survive wind, sun, and cold. You can't rush the science behind it. Those 7 to 14 days of gradual exposure give your seedlings what no shortcut can.
Spring is the best time to put this guide to work. Grab your trays, check your forecast, and start the process with confidence. Your seedlings will thank you with stronger growth and faster results once they hit the garden bed.
External Sources
Frequently Asked Questions
What purpose does hardening off seedlings serve?
Hardening off gradually exposes indoor-grown seedlings to outdoor conditions like wind, sun, and temperature swings, triggering physiological changes such as cell wall thickening and cuticle development that help them survive transplanting.
Could seedlings be hardened off in shaded areas?
Yes, shaded areas are ideal for the first few days of hardening off. Start seedlings in full shade or dappled light and gradually move them into direct sunlight over several days.
Which signs indicate seedlings are ready for transplanting?
Hardened seedlings show thicker stems, firmer leaves, and often develop pink or purple coloring in stems and veins from anthocyanin production, indicating stronger cell walls.
What is the best way to protect seedlings during unexpected cold snaps?
Bring seedlings back indoors or cover them with frost cloth, cloches, or portable mini greenhouses when temperatures drop below 45°F (7.2°C) during the hardening process.
What causes seedlings to wilt after being moved outdoors?
Seedlings wilt outdoors because they lose water faster through transpiration than their underdeveloped root systems can replace, especially when exposed to wind and direct sun too quickly.
Can artificial light be sufficient to skip hardening off?
No, artificial light cannot replicate the full spectrum of outdoor stressors including UV radiation, wind, and temperature fluctuations that trigger essential physiological adaptations in seedlings.
How does watering shift during the hardening process?
Reduce watering gradually during hardening off to encourage deeper root growth and carbohydrate accumulation, but never let seedlings dry out completely or wilt severely.
Could leggy seedlings recover during hardening off?
Leggy seedlings can partially recover during hardening as increased outdoor light and wind exposure slows elongation and encourages thicker, sturdier stem growth over time.
Which tools simplify the hardening-off process?
Cold frames, portable mini greenhouses, wheeled wagons for easy transport, frost cloth, shade cloth, and Wall-o-Water season extenders all make hardening off more manageable.
What is the right time for seedlings stay indoors during hardening?
Keep seedlings indoors when daytime temperatures drop below 45°F (7.2°C), during heavy rain, hail, or high winds, and whenever frost warnings are issued.